Here we are 2015 is nearly gone, & a full month of summer also fades with it as well, a new year looms very fast & with that to most it will mean more new models to arrive, & scenes akin to a Boxing day sale may not take place, but when one reads the Facebook home pages along with blogs for different importers it sort of does not seem that far from it, as the frenzy in anticipation comments take over along with a lot of thumbs up.
2015 for me has been all but a write off since end of October following a knee replacement which is still slowly comming good, little of anything other than some, meaning a very small number of new trees, as the sit down enables me to cull old ones & ponder on other items. The nice arrival of the 43cl was my loco highlight for the year, the pondering has certainly been enhanced by the sale of Austrains to Steven Pracey of SDS models.
The announcement was in some ways a bit of a semi shock but only I guess as the sounds from John Eassie for a while now, even allowing for some false starts, deflections with some well placed hits to almost every part of the field, but not really down the main pitch or the keeper. No news at this point of time has come from Steven except for the impending relase of some S wagons used for various works type tasks in the later years of their service, & 3 packs of the VR GY wagons, each a neat addition to the respective states modellers. The GY's no doubt will have some updating to bring them up to a standard that we have expected from SDS in the past & for the future.
For me the anticipation for what the future holds especially with this sale will be in the news release from SDS as to what they are looking to do with the items included so far in the acquisition, but not forgetting new releases of their own models so far on notice & probably some new ones as well. So as I personally wish Steven the best for the future, I also thank John Eassie for his input into the hobby, & I wonder how far it ever will be from him? So I hope that John may enjoy this new life & cruising be it on or in whatever mode he desires, & looks after his health.
One can wonder though, if the snippet news in an edition of the AMRM a little while ago that JE, was actually going into British HO models & the time in the Austrains line is wearing down, with Britrains to be his signature retirement projects. One way or another interesting times ahead.
At this point of time I would like to extend my best wishes to all & their families for the new year. May you enjoy good health & the year ahead provide you with all you would seek, peace & enjoyment.
Col

Meitian - Mongolia 2012 a lovely small village, where steam still existed, and with our heat ATM, this scene looks inviting still CHRISTMASS GREETINGS TO ALL
Wednesday, 30 December 2015
Wednesday, 11 November 2015
Auscision 43 & some 43cl memories
I have just received my Auscision 43cl, the first item other than the
goods shed that I have purchased from Auscision. First impressions are
quite good & am pleased to have added it to the fleet of loco's I
have. I admit to it not having been on my list of loco's for Essence in
the early days as I was after an all steam fleet, but on one of those
early reflections I realised the need for some early diesels to
represent the period I am modelling. I now have the 40cl from Eureka as
the sole outstanding diesel to come, & I have to admit to being
rather pessimistic on that front, which means just the TOR 42 &
modified 44cl with the 43 as being on the roster.
Opening the package was a nice surprise when compared to models from competitors was the printed items that came with the model, an exploded 2 sided sheet showing all the add on bits, & another sheet with general instructions on it. Sadly these are something that has been neglected by other importers of late.
While not a great issue, I would like to get the in cab detail section out with the figures primarily to paint them in other than green, it wasn't until around 1975 that E/men were issued with clothing of the sea green variety from King Gee, prior to that overalls or old clothes no longer in the fashion section were worn. Interestingly with that green clothing issue, a 3/4 length Navy Blue King Gee dust coat was issued, which many used to protect the clothes from the greasy/oily engine room of diesels like the 43cl, & other Alco types.


The above 4 photo's capture some of the very nice detail, especially the last one which highlights how well the bogies show up the air lines & difference to the Goodwins flat frames.
The challenge really is now to add sound, & to weather the model. How do you do justice to the model details when the realistic weathering appeared on these loco's almost from the very first start up after overhauls & the like. Oil leaks running down the side from exhaust, as well as at the side shutters, & air filter intakes along the side.
Oil leaks as hinted at in the 2nd paragraph was very much what was synominous with these engines, strangely though the 40cl which was fitted with the same donk, did not show the same amount of leakage, at least visible to the ear anyway.
As a fireman at Enfield, it was not unusuals to be on these engines, & in 1971 after passing the drivers school & on 3 days ground tuition, at Delec along with 5 others & the loco Inspector, we were taken over every diesel that was in the paddock or in the case of the 40cl, one that had arrived for 180 day inspection, the following day, so was positioned at the Northern end of 4 road between Load Box & shed. At that time the 43cl had some modifications on them, mainly the hand rails to the nose, but the bottom rung on the rear ladder still sat at the same level as the short diaphragm meeting arobics to use it & get into the cab that end.
As I worked them more when at Werris Creek between Nov 69 & Jan 71 I came across them more than Delec/Enfield, but when doing the drivers instructions on them the 6 of us were split up for the engineroom tour, thankfully this 43 had been cleaned in the engine room so oil was not as evidant. The thing was & like the 42, 422cl the 43 was blocked off to walk from #1 end to #2 end via the engine room, it was only by going down the firemans side could you get there, & on the 43 you need something like a dust coat over your normal clothing to keep clean, as even on that side was a twist motion to get to or from 2 end.
The worst part of it was that it was not until late in their career that full length ladders were added to #2 end, going light engine especially to Cooks River, the fireman had to work the staff hut at Marrickvile loop, & if you had the old short ladder, the only way you get back up in that end was to use the auto coupler lift rod as a step, & then swing yourself up, most drivers however would help you up by pulling your right arm while you hung on to the left hand side of the rail.
#2 end or hostlers end as it was called, was only fitted with an independant or engine Brake valve, which was carried from the isolated Brake Valve from #1 end, For the driver a short cushion was provided by being glued to the top of the weight block on that side. The firemans seat was the toilet, or he usually stood up for the LE distance that had to be run. Later vigilance controls was fitted next to the door for the fireman to operate, These hostlers ends on the 42 & 43 meant that enginemen had to sit in the engineroom with no noise barrier between the Prime mover & the so callled hostlers driving position.
No1 end cab, was a marvel, with entry doors all but opposite each other meaning a straight across walkway. Entry from standard shed platforms was direct, no step up or down into the cab, as it was the same level. For a first timer, once in the cab & looking at the seating position was a bit off putting, the floor was the same level all the way round to the nose door, there was a large step up, from the floor, than another step up towards the seats.
Standing on the floor it was not possible to see out the windscreens, the seat cushions were around shoulder height for me, original seats were good, but later replaced by kidney crushers. A cab heater of the blower type was originally fitted as was a water cooler, both later removed, the water cooler owing to some dysfunctional enginemen using it to empty billies into, rather than out the window, the fan heaters were too hard for the fitters/electricians to keep going so standard (useless) non radiant bar heaters were fitted.
The seated position, was incredible, & one hoped these were not rough riding engines, of any type, as if you came off the seat, you would likely break your neck, they were that high. For the driver, the controls rudimentary by todays standards were all well in reach, old speedo's had no tapes in them so, a bit of speed overrun was found with them to enable momentum running of the train. The main throttle handle like the 40cl originally had ratchet opening, meaning you could only open the throttle one notch at a time, but when you advance the throttle you had to let go of it to release the ratchet then open again.
These were progressively removed, but at least one of the 40 & 43cl had them fitted well into the 70's.
As for operating them, I beleive along with the 40cl they were the best riding diesel from the 1st generation engines, they actually were way out in front in that regard, unlike the 44 which would swish & bounce in road holes, or the 42cl which would outdo the 44cl & I think a reason why the original seats had arm rests for you to hold on to over certain sections known for holes. The 43's breezed through them. It was only when the 422cl & 47cl arrived that we had diesels that came close to old girls for ride qualities.
Having enjoyed the presence of the model on the layout it will now go back into the box until I work out which sound decoder to fit.
Tuesday, 13 October 2015
Gnomes, those little unreal objects that stick up in gardens, love em
or hate em, they seem to be found in many inespicable places,
especially the unknown or unseen or ungnome types. I started to think of
those little items in the garden during the past 2 weeks of work on the
layout in preparation for 2 open days during the NMRA conference at
Ettalong.
The gnomes or should I say the known aspects of the layout as far as operating locomotives are concerned comprise of 1x32cl (TOR); 1x35cl (Austrains), 3x36cl Austrains, 1x59cl DJY, & 1x42cl (TOR). Also in the fleet but not as yet run over the layout except for running tests include 1x57, & 58cl both DJH models. I would have liked to have had the big engines working but as they had derailed on some locations, I believed that it was a lot easier to get the 59cl working over the layout without problems first, and as its turned out a good option.
The week leading up to the first open day, on Friday 18th October, had all things working well, no hiccups, & even the 59 was running around without problems at least in the one direction I had tested it on, which was good enough for me, the day & the known gnome. On the Thursday evening I went to bed with a sense of relief & slept well. Then Friday!
To the Train shed early to make sure all was ok, & as the first train for test was about to be run, a loud bang, & I looked over to discover the drop down bridge had come down by itself, or as it turns out by a very strong gust of wind, a check of the bridge & approaches found the track on the high side or the side that was not on the hinges, had broken away, & the alignment was shot. With an hour to go before visitors I had to relay the approach track & realign the track, & bridge. The first ungnome event for the weekend had poped up, but I managed to just get fixed before the first visitor.
With the Friday being a very windy day, the bridge was left down & lifted as required for entry & leaving, a good thought as that was its purpose.
Gnomes I understand have their primary origins in Ireland, & the wind/bridge episode was the precursor to several other incidents that are brought about by the unknown & unseen vistor, the ungnome commonly referred to as Murphy, these are the little things that can destroy a day or more & lead to much frustration, no sooner had I started running some trains for the visitors than some played up, thus the promises that seemed to have been provided on the pre visits were out the door as it were.
As much as I tried to work on the bridge & lead to track, I was only able to get 3 loco's to run without problems, the 32, 35 & one of the 36cl. The one effort from the 59 ended in deep frustration, & it sat in a loop in disgrace.
The upshot of this ended when a group turned up & were not worried about having anything run, & it was just an explaination of what I was trying to achieve & pointing out the various points of the layout, to me this brought out the thing I love about the hobby, sharing with strangers tips as well as remedies to many areas of modelling. On the Friday I had 14 visitors & only 5 on the Monday, it was a first for me in having an open day but one that was most enjoyable.
The issue it seems with the 59cl is common as one Taree club member who has assembled quite a few of these DJH kits told me that they commonly derailed if all the driving wheels had the wheel spacers put in place during construction, as it made them very rigid across the driving wheels, he said that on all his installs he only fits them to the main connection of the rods.
On the Saturday night of the Liverpool Exh weekend, two friends in Rod Young (Comtrain) & Roger Lloyd from Victoria had a night with us, the layout proved an interesting time, & I give thanks to Roger in that he watched the procession of derailments & suggested the set of points was more likely the problem, & by doing some realignments could well resolve the problem with the 59. The thought did not worry me as I had decided to make all the points on the layout including here with slide switch operation rather than servo/singlet type operation, meaning a fair degree of work had already been done here.

What came out as a result was that the track had actually had a twist in it, along with the track not being set correctly at the Jacks Creek end with the radius being less than the 28" it had been set for. Running the aluminium alignment gauge down the length all the track was fine untill near the bottom. being reset to correct radius was surprising at how far out it was. Fixing that was time consuming with the track only getting pinned down, until the primary gnome was despatched.
Looking to Jacks Creek & my mind went to what Roger had previously said, so as the 59 was still giving problems, I removed the loop/goods shed points, reduced the distance between the main line points, & made a direct straight approach to the goods shed & run round road. Dare I say Woo Hoo.

With all the trackwork being finished the next thing was to get the 59cl working. Taking the model back to the group member who had built it, he removed the wheel spacers from the 2nd & 3rd set of driving wheels, which has fixed the derailing problem, it runs without any problems into each of the 3 roads now.
The only problem if one can say it is that it needs to have a fair bit of running in, another feature of these kits is often the grinding like noise that comes from them until they get up a bit in speed, the running in will finally bring it line to be put to work, once it has done checks around the other points on the layout. The 57 & 58cl are also getting the spacers removed they too will be tested in the same way, so here's hoping.
So, where are the gnomes? Well the alingnments of the points were the unkowns, owing to the problem being non existant for a large proportion of the locomotive fleet, yet at the same time they were also the visible ones that were causing grief.
Well, just as I was getting quite happy with the way things were going, the hidden gnomes showed up again, as Murphy had a field day, when after some running the 59cl died, no power no having run around the layout around 6 times without any real hitches, it simply stopped. No sign of shorts on the track, so back to running a 36cl & it ran without problem over the whole layout. Then to finish it all, the original Chinese coupler on the TOR 32 decided it too wanted to toss it in, with the jaw spring going missing, causing constant uncoupling, just as well I do not drink Irish Whiskey that would have brought in the Murphy family to the circus.
As per usual, when something happens with couplings especially the large & poor Chinese varities I replay them, so that was carried out using a Kadee Whisker coupler, with no room for a full Kadee box, along with the screw not being long enough to give a decent bite with the box in place anyway, I simply slotted the cover & coupler into the cutout, using some blue tack to hold the cover in place, also removing the rear wheel for ease of access. Screwed in place the whiskers fit neatly in the cutout & work a dream.
Hospital again on Friday for new knee, so the door gets pretty well locked at Essence.
The gnomes or should I say the known aspects of the layout as far as operating locomotives are concerned comprise of 1x32cl (TOR); 1x35cl (Austrains), 3x36cl Austrains, 1x59cl DJY, & 1x42cl (TOR). Also in the fleet but not as yet run over the layout except for running tests include 1x57, & 58cl both DJH models. I would have liked to have had the big engines working but as they had derailed on some locations, I believed that it was a lot easier to get the 59cl working over the layout without problems first, and as its turned out a good option.
The week leading up to the first open day, on Friday 18th October, had all things working well, no hiccups, & even the 59 was running around without problems at least in the one direction I had tested it on, which was good enough for me, the day & the known gnome. On the Thursday evening I went to bed with a sense of relief & slept well. Then Friday!
To the Train shed early to make sure all was ok, & as the first train for test was about to be run, a loud bang, & I looked over to discover the drop down bridge had come down by itself, or as it turns out by a very strong gust of wind, a check of the bridge & approaches found the track on the high side or the side that was not on the hinges, had broken away, & the alignment was shot. With an hour to go before visitors I had to relay the approach track & realign the track, & bridge. The first ungnome event for the weekend had poped up, but I managed to just get fixed before the first visitor.
With the Friday being a very windy day, the bridge was left down & lifted as required for entry & leaving, a good thought as that was its purpose.
Gnomes I understand have their primary origins in Ireland, & the wind/bridge episode was the precursor to several other incidents that are brought about by the unknown & unseen vistor, the ungnome commonly referred to as Murphy, these are the little things that can destroy a day or more & lead to much frustration, no sooner had I started running some trains for the visitors than some played up, thus the promises that seemed to have been provided on the pre visits were out the door as it were.
As much as I tried to work on the bridge & lead to track, I was only able to get 3 loco's to run without problems, the 32, 35 & one of the 36cl. The one effort from the 59 ended in deep frustration, & it sat in a loop in disgrace.
The upshot of this ended when a group turned up & were not worried about having anything run, & it was just an explaination of what I was trying to achieve & pointing out the various points of the layout, to me this brought out the thing I love about the hobby, sharing with strangers tips as well as remedies to many areas of modelling. On the Friday I had 14 visitors & only 5 on the Monday, it was a first for me in having an open day but one that was most enjoyable.
The issue it seems with the 59cl is common as one Taree club member who has assembled quite a few of these DJH kits told me that they commonly derailed if all the driving wheels had the wheel spacers put in place during construction, as it made them very rigid across the driving wheels, he said that on all his installs he only fits them to the main connection of the rods.
On the Saturday night of the Liverpool Exh weekend, two friends in Rod Young (Comtrain) & Roger Lloyd from Victoria had a night with us, the layout proved an interesting time, & I give thanks to Roger in that he watched the procession of derailments & suggested the set of points was more likely the problem, & by doing some realignments could well resolve the problem with the 59. The thought did not worry me as I had decided to make all the points on the layout including here with slide switch operation rather than servo/singlet type operation, meaning a fair degree of work had already been done here.

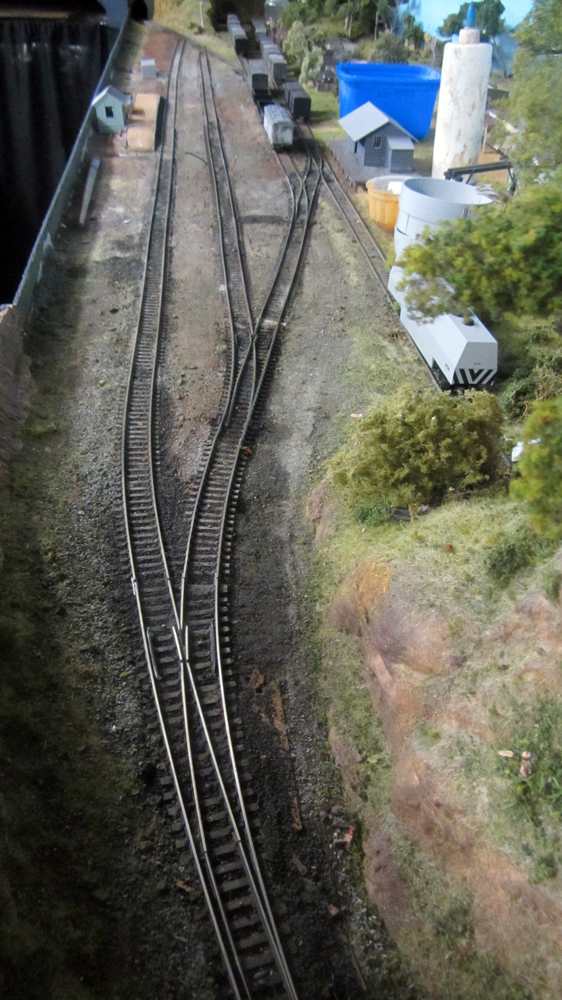
The 3 problem areas & points
Fast
forward somewhat:- Well after a week of some frustrations, which
included not just the need to fix points & track in the yard/loop area but I had to do a complete lift of the track from Nullo
Mt, down to Jacks Ck owing once again to the factor that I believe Murphy was in the cab & driving the 59cl as it dropped off the track in a couple of spots, something that had not occured previously. Coupled with the aspect that there was
still a problem with the primary points from Main line to the loop &
goods shed area, with the 59 still derailing.What came out as a result was that the track had actually had a twist in it, along with the track not being set correctly at the Jacks Creek end with the radius being less than the 28" it had been set for. Running the aluminium alignment gauge down the length all the track was fine untill near the bottom. being reset to correct radius was surprising at how far out it was. Fixing that was time consuming with the track only getting pinned down, until the primary gnome was despatched.
Looking to Jacks Creek & my mind went to what Roger had previously said, so as the 59 was still giving problems, I removed the loop/goods shed points, reduced the distance between the main line points, & made a direct straight approach to the goods shed & run round road. Dare I say Woo Hoo.
After.
The rearrangement made the whole area look much better, the loop is closer to the main line as it should be, although the curve out is intentional as a water column is to go in between the main line & loop, something that was not uncommon on NSW rails during steam days.With all the trackwork being finished the next thing was to get the 59cl working. Taking the model back to the group member who had built it, he removed the wheel spacers from the 2nd & 3rd set of driving wheels, which has fixed the derailing problem, it runs without any problems into each of the 3 roads now.
The only problem if one can say it is that it needs to have a fair bit of running in, another feature of these kits is often the grinding like noise that comes from them until they get up a bit in speed, the running in will finally bring it line to be put to work, once it has done checks around the other points on the layout. The 57 & 58cl are also getting the spacers removed they too will be tested in the same way, so here's hoping.
So, where are the gnomes? Well the alingnments of the points were the unkowns, owing to the problem being non existant for a large proportion of the locomotive fleet, yet at the same time they were also the visible ones that were causing grief.
Well, just as I was getting quite happy with the way things were going, the hidden gnomes showed up again, as Murphy had a field day, when after some running the 59cl died, no power no having run around the layout around 6 times without any real hitches, it simply stopped. No sign of shorts on the track, so back to running a 36cl & it ran without problem over the whole layout. Then to finish it all, the original Chinese coupler on the TOR 32 decided it too wanted to toss it in, with the jaw spring going missing, causing constant uncoupling, just as well I do not drink Irish Whiskey that would have brought in the Murphy family to the circus.
As per usual, when something happens with couplings especially the large & poor Chinese varities I replay them, so that was carried out using a Kadee Whisker coupler, with no room for a full Kadee box, along with the screw not being long enough to give a decent bite with the box in place anyway, I simply slotted the cover & coupler into the cutout, using some blue tack to hold the cover in place, also removing the rear wheel for ease of access. Screwed in place the whiskers fit neatly in the cutout & work a dream.
Hospital again on Friday for new knee, so the door gets pretty well locked at Essence.
Sunday, 20 September 2015
For a while now I have been trying to concentrate on getting several areas of the layout finished, not that one would notice any real changes as most of them have been in the unseen areas of the layout, in some ways a frustrating time to say the least. However, during this time I have also had a lot of reflecting on the layout & what I want to do & achieve in this minature world of railways.
Early on I decided on making the layout set up with 4 locations plus the staging or transfer yards, this meant having single line working between each of the locations which are quite short in length, one of them around 1.5 metres in length, hardly enough to put signals in place in that section, but that's how it is in model world rather than real world. At the moment I am working on what method of operations to have between the stations, staff, or single line track block, both of which could be readily done, but that's a decision still to come.
Signalling as such is to be all Lower Quadrant types, of the 4 locations I am installing different types of signals to represent the various types that were found around NSW, at least in the main & secondary lines, these are in general different to the untrained eye, but subtle differences were abounding over the NSWGR system.
With that in mind the primary work has been on getting the point work along with the signals into operation at Moblayne, the signals are built by Dale Richards, & in the main they all will have lights in them, this feature has proved to be a right pain in the rear, with the wires breaking on some of them, but those installed so far are fine. The signals at Moblayne have home bracket signals at both ends, being main, loop & rocker arm siding signals lower on the post to enter the yard, this type of signals were found at Werris Creek as well as Moss Vale off the Illawarra line, but here there are 2 different types of bracket signals.
Standard Main Line & Loop starting signals are provided, along with siding signals for yard exit, the siding signals for yard exit were found at Werris Creek for up trains departing South Box. An Outer Home/Inner Distant signal is provided on the down line to protect the future Abatoirs siding, a fixed distant arm along with operating standard sized Home signal is on these types of signals.
Each end of Moblayne has a control panel, Moblayne East & Moblayne West. Down trains approach at East box. The panels when view may well be something that some will raise eyebrows & likely be a point of derision, & something I am hope does not happen. Reason for that is that each road has been given a colour code & pin strip tape used to show the roads, which is really the NSWGR method of having each yard roud numbered, thus my numbers will have colours in both the yard roads & controllers,by using Tam Valley singlets to control signals & points in conjunction with servo's.
I have not used the LED's that come with the Tam Valley products rather I use 3mm LED's of the same colour as shown for the roads, when the points are set for that road. A 3mm warm white is used to show what is the normal lay of the yard points, when reversed to allow a train to enter or depart from a yard road, the colour of the road will be illuminated for its passage as will the appropiate colours for other points leading to the main line.
Habit or should I say operating instructions will need to be instill into operators the mode of doing things in correct order. When train are entering or departing the yard, the first thing to do is ensure the points are all set correctly, before clearing the appropriate signal. Once train has departed or arrived the points are to be reset to normal lay.
In the same way, on the control panel all the Home signals will display red as normal signal, cleared the panel lights will show a green if going through the main line - station, entering the loop will show a yellow, (the usual colour for turnouts on other types of colour light signals). Here is a clear break from what is deemed to be prototypical, but from my perspective the wrong element in the signal board will give crewmen a true indication of which line they are to enter. The Home signals will show a white light rather than a green on the panel when trains are arriving & turning into the yard for shunting or engine change, as white lights will showthe normal lay of the yard points.
The general reasoning behind all of this is to try & prevent something that can be a common problem on layouts generated by some modellers, & that they will stop their train to check the points before moving through them. In some ways that sounds reasonable however, that is the responsibility of the person who will be in charge of the operations at Moblayne, as well as all other station/yards on the layout. The panels are designed to be operated in the same way as a signalman operates the points in the real world & that is points are set prior to clearing the appropriate signal for the movement.
The real world operations in the period I am modelling & for a wide area when I was still on the job, in this case cannot be replicated in full unless one invests heavily in an interlocked lever frame operation, something that is out the question for me. A signalman when starting his shift, only has to look at the frame to know how the points & signals are positioned. When he has to change the points & signals, he has to throw the interlocking lever that is protecting the signals against a wrong operation, any attempt to do so will be met by the lever being locked & unable to be moved until the other levers are pulled in correct sequence, then the appropriate signal can be cleared,
Modelling for me in this way, means that the points have to be thrown correctly first, & then ensure all the points are set correctly for the arrival or departure of a train, before clearing the appropriate signals, the colour lights will show correctly for the movement from the point lights.
This aspect means for me or any layout owner we have to ensure we have our track & especially the point work in top shape, this & the above working outs have meant a fair bit of time occupied on this vital area at the expense of a lot of other things. Knee problems & a replacement scheduled for late October has not help, (Dontcha love getting old with all that free/spare time?)
With the Aussie$$ dropping & a final workout of how many Tam Valley servo controllers I need for the points on the layout, assesed against what I have, meant that I would be needing around 20 of them for full control panel operations, reality stepped in as that would be near enough $U.S250.00 plus shipping.
A drastic rethink therefore was in order so I have begun a process of using mini slide switches with Piano wire & the push pull method of operating them, With some careful work I think I can get away without the need for anymore of the Tam valler controllers, so far two lots of points have been treated along with 4 more ready for the work, I will still look at having all the main line points worked by the servo's & controllers.
The use of operating signals which I had not planned for when I purchased the primary supply when the AU$$ was on the other side of the equation has caused the problem but I think I am a winner anyway.
Sunday, 9 August 2015
No modelling stuff here.
Well, its been some time since my last post, but while a lot has happened, there's not a lot to show for it, hopefully I will be able to provide a better update in a few weeks.
This weekend however, has almost been a right off in many aspects owing to rotten computer issues. I have used Windows 7 64 Pro now for some time, the last few months has actually been great even though the continual updates have been a bit monotenous especially in regard to size, but the speed of boot up, shut down & other aspects of the OS has been worth it.
I was at the same time aware that Microsoft has been working in the background to get us all to use their new wonder OS windows 10, the cheese for the trap was it will be free for Win 7 users, on ThursdayI was notified that I was able to Download the new whizz banger, initially I was reluctant as I was warned of some hours for the process to take place, but having seen how it seemed to work on a laptop at our weekly meeting on Wednesday, Win 10 did seem to look ok, so on Saturday afternoon I took the plunge & decided to go with it, the time I started on was around 200pm.
At 730pm, I was finally able to use my computer after the installation was finished, although it showed I was only 80% complete. 5 1/2 hours left me unimpressed to say the least. then working out how to get my internet working along with some other items took me another 2 hours, that is after I had to try & unscramble the internet settings.
Then the computer would no longer turn off, it would restart after each run down, so I had to to manually push the on button & hold in to turn off. Every time I turned on, & go to the internet, no longer just a click on the task bar icon, but I had to type in IE, or Mozilla to get the web browser & go through security password checks each time.
Boot up takes around 4 minutes as against less than 2 in Win7, the whole of the monitor & personal settings are a mishmash of terrible settings, that has to be the worst I have seen. What, also gets me is the way that so many tasks that are dead easy in Win7 are so much more complicated in 10. But, its not all bad news I guess, as if you are one of the tablet & smartphone thumb operators, then you may well be right at home, even the reviews while casting positive posts, all seem to point out that the new system is pointed towards that medium.
Microsoft they say, are going to change our ways in how we use our computers, the new way is the mobile style, the OS has touch screen & other tablet linkages meaning you may have less need for keyboards, as the monitor can do it for you, if you spend on new ones.
So, for this dinasour, I will stick with Win7 as long as its possible.
Friday, 8 May 2015
Old events, ever new.
A need to do some clearing up & getting the train room ready for my shift at hosting the local group meeting brought back another of those old events, ever new thingy's. Its one of those annoying little things that seems to be ever present with me, yep its an old thing, but shows up in ever new ways, especially to cause frustrations, & raises my blood pressure, also increases my heart beat without the need for my pacemaker to wear out much of its battery power.
Three aspects were needed to prepare for the meeting, & one was to try & ensure I could run some trains, so I thought a good time to test my DJH 59cl to see how it handled things, I had been warned a bit about the longer & more rigid chassis of these models that would find any faults in my track, likewise I was told the same would happen with the DJH 57 & 58classes, but if the 59cl would negiotiate the tracks, then the others would not be too bad. Well I did find some glitchy spots with the 59cl but after a couple of hours work on the small spots of bother, & the model went around without any further problems. So a degree of joy & satisfaction was achieved.
So next was to get the various items ready for the tree clinic I was doing that night. This was not a great concern as it was just a build up of what I had been doing for the past 6 odd weeks as I did a lot of tree clearings on the layout & getting rid of a lot of rubbish items as well as cleaning up old trees ready to be updated a bit. Likewise the need to do some new armatures for the main trees to demonstrate how to create totally different trees to those I had done in the past. I have to say this whole exercise with the tree making has been immensely satisfying to me,
The third item was one that while small in its presence & size, is one of those things that raises my temperature somewhat as its one of those things that does not go away, & I have wrent my frustrations about it in previous blogs.
As I cleared away all models from the tracks around Moblayne, I happened to notice a small black item sitting near the track approach to the goods road area, I picked it up & it was something totally different to anything I had seen before, & it had me scratching my head as to what it was. It took me a little while as I retraced what I had been doing, all the R.S items I had moved away did not have anything that would remotely resemble having anything like it on them, until I remembered one specific item that I had moved, & located it around that spot for a short period of time,
I went over & picked the model up, & finally found where the black bit was meant to go. So what was this mysterious bit? It was off one of the newish Austrains ACX coaches bogies, & was quite obvious where it fitted, as the bogie seems to have more seperately applied bits on it than other bogies I had seen. The small item was a single casting that included the axle box cover, with spring attached over it & then a small piece which would be some sort of shock absorber, the bogie sideframe itself showed just how devoid or real detail with this bit missing.
The trick was to locate the 6 small pin bits to the associated holes in the bogie sideframe without damaging any of the other fine plastic detail around the bogie. Thankfully, I was able to get the bit back in place with a fair degree of care, but I am not happy about how securely its going to stay together, as experience has shown me with other models that have these plastic bits fall off are rarelly able to be glued back on satisfactorilly.
Its likely to be something I read about a while back about a new bogie making technique being tried by a Chinese company whereby the main bogie assembly will be cast in one piece, & most, or all of the external parts will be made seperately & then factory applied to models assembly. It meant that a bogie that had different external looks to them could be made much cheaper than having to cast a full bogie for each, & this applied to Dean type bogies & while I am no bogie expert, I am thinking that the bogies on the ACX are in that category, with the standard & Dean bogie having slight differences to them.
While thats all well & good, it raises that old issue of detail vses quality, that is with the way the amount of extra detail that is said to be demanded by modellers. But I wonder who are the said modellers demanding this, as I doubt they would be asking for the fragile element in the amount of it,
rather if the demands came from operators they would be looking for for the detail to be more robust in nature. Not much point if the items end up more on the floor or layout after short time use or even gentle handling, in a derailment or the like.
On one of the sidings I had an OTM LLV, Casula G wagon kit part assembled, Eureka G wagon, 2 TOR original S trucks, one TOR Steel S tuck, & Austrains Ultimate S truck. The level of the layout sits at the top of my stomach around 1200mm from the floor. I stand around 5'10 tall & looking down on all those models, at distances from 8 inches & then full arms length away, I was only able to see, such items as the spider hand brakes, Grade Control Valves, Shunters steps, & on the S trucks the the main brake piston cylinders with the triple valves that hung down at one end, along with the brake tension rod wires. All of the other sundry brake rigging was not visible, from either vantage point that I looked at them.
Of those models, the Ultimate S, G & LLV has relatively fragile plastic detail parts, already I have had to assemble the doors of the G wagon as it fell to bits when I lifted the door top locking section, & that was fun getting it back together. Following on from this I had the doors again come off & not they are all glued together, but still feel quite fragile.
Saturday, 7 March 2015
Branching out #2
Last few weeks have been basically quiet but as I am working towards doing a mini clinic on making trees, this has been a bit of a focus for me.
My previous post had a couple of photo's with trees using both the tree or scale leaves from Polak as well as from Scenic Express. Having now used them both on several well 4 trees all up with the Scenic express ones I still have near a 900gram Kraft peanut butter jar all but full, & the cost was $U.S 9.00 for the bag, what is left of the Polak leaves, from 4 of their jars is now sitting in one, they cost around the same price each as the Scenic Express leaves, so no question on the value difference.
The trees I am doing now are very much different to those in the past, where I used the old formula of high arch type trees with Heki or Bachman fibres to form the tree covers & then medium foam for the leaf cover.
Now I am using the same copper wire armatures but in much thinner trucks & soldering on thinner branches this is to get some variation in trees on the layout. Some quick new arrivals on the layout as samples
 A repeat of the fallen tree using the Polak leaves
 Beginnings. An old large armature halved in size & thinned out further towards the top, to provide the high branches. Soldered in branches both in the main fork as well as along the branches provides the main tree formation.
Next are some trees using the Scenic Express scale leaves to go over Bachmann/JTT fibre mesh, much more stretched out then with the more normal foam material. Each are of the same construction method as shown here.


My previous post had a couple of photo's with trees using both the tree or scale leaves from Polak as well as from Scenic Express. Having now used them both on several well 4 trees all up with the Scenic express ones I still have near a 900gram Kraft peanut butter jar all but full, & the cost was $U.S 9.00 for the bag, what is left of the Polak leaves, from 4 of their jars is now sitting in one, they cost around the same price each as the Scenic Express leaves, so no question on the value difference.
The trees I am doing now are very much different to those in the past, where I used the old formula of high arch type trees with Heki or Bachman fibres to form the tree covers & then medium foam for the leaf cover.
Now I am using the same copper wire armatures but in much thinner trucks & soldering on thinner branches this is to get some variation in trees on the layout. Some quick new arrivals on the layout as samples
Next are some trees using the Scenic Express scale leaves to go over Bachmann/JTT fibre mesh, much more stretched out then with the more normal foam material. Each are of the same construction method as shown here.
Friday, 13 February 2015
Branching out.
With Christmas now gone, & with other areas of work needing done around the house, not a lot has been going on, well maybe a bit of destruction has taken place in at least one area, owing no small part of dissatisfaction with how aspects of the layout were done in the past. However with the weather (HEAT) not providing a comfortable work environment in the train room or out in the yard not a lot really has progressed.
After the effort put in to improve Coxes, I really started to take a new look over the remaining areas of the layout, in particular wanting to lift the work I had was doing to a better standard, it was a challenge & as Coxes only needs a small amount of work to finish it off, primarilly to do the water course & just tidy the area up with some structure fittings. To walk away from Coxes & go to Moblayne which has become the main focus for a while, I had to look directly at the section of track that runs up to Akuna along the side wall.
This was pretty well the first & only section that I was happy with especially as it was really pretty well complete, but each time I looked at it I could see shortcommings & problems with the backdrop. I guess its easy to simply hide problems with some scenery such as trees & the like but when one starts to look & not even too closely at this area I realised how poor some of the trees were as they could do with being covered up from sight. Thus stage 2 of horticulture changes began & thats not a bad idea for some sit down work without exerting oneself in this weather.
Along this wall I had not long also added a couple of clouds on the backdrop, as I looked at the work to be done I noticed some white paint overspray on the ground & some trees, which made the job a bit bigger than I had planed on but, it was no great worry as I saw the trees as ones needing work & some updating as well. So with all the trees along the section removed I noticed ome run marks on the back drop, being quite noticeable when standing at the layout edge it meant work to rescue that area as well.
 Trees removed & the damaged section of the backdrop, This clearing up of the area also highlighted the need to also try to improve this whole area as well.

Reworked backdrop & painting with the area cleared. Next step was to remove as much of the grassed area as possible & raise the grassed area to the same height as the back area.

Section to be worked on with trees removed & ground area built up the foreground to a more even level to that of the back. Next is to redo the grassing & put the fencing back in place. Above photo is of reworked section awaiting new grass, fences & the like.

New grass applied after a bit more work on the sky, fences & trees still to be added.
My old trees were pretty much a real mish mash of ok & not, those taken down revealed a fair few needed work to bring them up to something a bit better

One of the original examples of trees dating back several years with the Hechi MicroFlor netting, that had been hiding in a batch of others along the affected wall, I didn't think anyone could get that stuff looking as bad as this.
Other trees that had to be worked on was those that I had used Micro Mark fibre mesh for the tree coverings. As I come across these trees, I remove the mesh & bin it all, replacing it with Bachmann fibre mesh with more time spent on getting variations in shapes.
Reason I got rid of the Micro Mark mesh was that when using especially craft spray glue, & even hair spray, for the flock both reacted with the mesh & shrunk it, leaving the mesh in a tacky & shrunken finish, they were still the same after 2 years, also it did not take either sprays well in regard to holding the flock on.
 Above showing the Micro Mark fibre, some flock is still attached to it, but the whole of the fibres which had been teased out quite thinly, has shrunk back into a clump like matting that cannot be worked on any more.

Above shows the Bachmann fibre mesh teased out in the same manner as the Micro Mark item, sprayed with hair spray only & the following is an end result.

 The station area is an attempt to provide an example that tyified many rural locations, that had a main street & shops on one side then a parkland outside the station, trees provided relieving summer shade on hot days, sometimes closely planted sometimes not. I am still to decide if more are needed.
 Behind Moblayne loco depot are some early attempts of glueing together some old Sedum flower stems. While Sedums do provide a fairly natural looking high style of Eucolyptus trees, not all were just top clustered with leaves. The two on show are the first attempts, slicing thin basically useless single stems to the side of a main truck provides a different & I think more natural or true example of how many Eucalypts look.
 Fallen trees were often part of the scene, the roots sticking in the air with a couple left in ground providing life support for the tree. This tree uses some of the expensive Polac leaves which are a nice example for some types of wattle trees.

 Two photo's of probably my most ambitious project so far. The copper wire I have used for a while now has been very thing & readily gets tangled & bits get pulled out, unlike the thicker trunked fallen wattle in previous photo, many wattles were quite straggly trees & only the leaves & flowers provided a decent looking tree. I decided to try & do some artwork with the thin wires by twisting together many of the loose strands, soldering in key points for strength, also cutting off arms for lower branches then soldering in a longer top section while leaving the wires basically limp.
The big challenge was applying the no more gaps covering especially on those top single strand areas. Two coats above the main lower trunk was sufficient, & the lower trunk had 5 staged coverings. Painted using Sonja's Nimbus grey & then thin rough strips of black prior to the leafs being applied.
I have used a relatively new product I discovered on the Scenic Express webb site called Super Leaf http://www.sceneryexpress.com/SuperLeaf/products/1289/ These leafs are basically identical to the previously used Polac leaf material & a fraction of the price. The covering using the cheapest hair spray as glue was accomplished with 2 covers.
Even though cheaper than the Polac leaves, I always have a plastic washing dish under the trees as I shake the tree materials on tot he branches.
After the effort put in to improve Coxes, I really started to take a new look over the remaining areas of the layout, in particular wanting to lift the work I had was doing to a better standard, it was a challenge & as Coxes only needs a small amount of work to finish it off, primarilly to do the water course & just tidy the area up with some structure fittings. To walk away from Coxes & go to Moblayne which has become the main focus for a while, I had to look directly at the section of track that runs up to Akuna along the side wall.
This was pretty well the first & only section that I was happy with especially as it was really pretty well complete, but each time I looked at it I could see shortcommings & problems with the backdrop. I guess its easy to simply hide problems with some scenery such as trees & the like but when one starts to look & not even too closely at this area I realised how poor some of the trees were as they could do with being covered up from sight. Thus stage 2 of horticulture changes began & thats not a bad idea for some sit down work without exerting oneself in this weather.
Along this wall I had not long also added a couple of clouds on the backdrop, as I looked at the work to be done I noticed some white paint overspray on the ground & some trees, which made the job a bit bigger than I had planed on but, it was no great worry as I saw the trees as ones needing work & some updating as well. So with all the trees along the section removed I noticed ome run marks on the back drop, being quite noticeable when standing at the layout edge it meant work to rescue that area as well.
Reworked backdrop & painting with the area cleared. Next step was to remove as much of the grassed area as possible & raise the grassed area to the same height as the back area.
Section to be worked on with trees removed & ground area built up the foreground to a more even level to that of the back. Next is to redo the grassing & put the fencing back in place. Above photo is of reworked section awaiting new grass, fences & the like.
New grass applied after a bit more work on the sky, fences & trees still to be added.
My old trees were pretty much a real mish mash of ok & not, those taken down revealed a fair few needed work to bring them up to something a bit better
One of the original examples of trees dating back several years with the Hechi MicroFlor netting, that had been hiding in a batch of others along the affected wall, I didn't think anyone could get that stuff looking as bad as this.
Other trees that had to be worked on was those that I had used Micro Mark fibre mesh for the tree coverings. As I come across these trees, I remove the mesh & bin it all, replacing it with Bachmann fibre mesh with more time spent on getting variations in shapes.
Reason I got rid of the Micro Mark mesh was that when using especially craft spray glue, & even hair spray, for the flock both reacted with the mesh & shrunk it, leaving the mesh in a tacky & shrunken finish, they were still the same after 2 years, also it did not take either sprays well in regard to holding the flock on.
Above shows the Bachmann fibre mesh teased out in the same manner as the Micro Mark item, sprayed with hair spray only & the following is an end result.
With trees being worked on especially those that I hope will be in more prominent areas on the layout, a fair amount of testing of where to locate them, the following photo's show some end results of the reworked trees & positions they are likely to remain in.
The big challenge was applying the no more gaps covering especially on those top single strand areas. Two coats above the main lower trunk was sufficient, & the lower trunk had 5 staged coverings. Painted using Sonja's Nimbus grey & then thin rough strips of black prior to the leafs being applied.
I have used a relatively new product I discovered on the Scenic Express webb site called Super Leaf http://www.sceneryexpress.com/SuperLeaf/products/1289/ These leafs are basically identical to the previously used Polac leaf material & a fraction of the price. The covering using the cheapest hair spray as glue was accomplished with 2 covers.
Even though cheaper than the Polac leaves, I always have a plastic washing dish under the trees as I shake the tree materials on tot he branches.
Sunday, 18 January 2015
New Arrivals
Progess at Essence has been all but put on hold owing to Christmas which takes up a lot of time with family & other important commitments that has placed some restrictions on time for the layout. But with some new arrivals since New Year, I need to find time to finnish off the area for these items.
The big thing that I have wanted to get done for a while now is to get operating signals in place, I had a couple of Gwyder Valley Home/starter signal kits which I thought I could build one day, when I looked into the kit "to do" bin last year, along with the other items I realised it would be a while before they were built.
The primary aspect that I wanted was that if I was to have signals they needed to be of the working kind on & with lights, I wanted that in order to provide reality in the operations &, when doing so in operating sessions, then the operators would have to work to signals & light operated point indications.
WHY?
Well for me, too often I see operators stopping their trains to check points etc before proceeding, imagine how the real world of railways would go if drivers ignored the signals & what position they were in & stopped at every set of points to check them, before proceeding. Yes! there were circumstances when signals had to be challenged, at point of no return signals being passed in the wrong indication, but it goes deeper than that.
As Essence is based on a period that spans the years from around beginning 1955 - end 1957 set somewhere in a slopes area in NSW, on single line, the signals were to be of the Lower Quadrant type. Looking at was around at the time I found the available offerings wanting, & having seen on one of the blogs I follow some nice signals, I decided to get Dale Richards from the McKenzie group to build signals for me, so far the area at Moblayne has received all the signals bar 2 needed for operations, not all are placed in situ owing to other work to be finalised first, but some photo's here show the down end of Moblayne with signals in place.

Signals in situ, for down trains approaching Moblayneis the outer home, a fixed distant arm, with operating home type arm, provided protectection for the Moblayne saleyards/abatoirs sidings, working willl be conducted by the Moblayne shunting engine with a key/staff operation that will place the signal at stop.
The home signal for Moyblayen is not shown but is the same type as shown for the Up Home.


Main line Starter is cleared for a holiday passenger special to depart

A closer shot showing the Up Home & water tank for Loco, the tank itself has been weathered using soft pastel chaulks.

The Up Home signal for Moblayne, a mirror reverse signal is also used for the Down Home signal, a display board will set the signals to show how they are to be read by drivers, from Left to Right for which road,, Right hand high is main line, Left hand high is loop & bracket signal entry to yard area.
The big thing that I have wanted to get done for a while now is to get operating signals in place, I had a couple of Gwyder Valley Home/starter signal kits which I thought I could build one day, when I looked into the kit "to do" bin last year, along with the other items I realised it would be a while before they were built.
The primary aspect that I wanted was that if I was to have signals they needed to be of the working kind on & with lights, I wanted that in order to provide reality in the operations &, when doing so in operating sessions, then the operators would have to work to signals & light operated point indications.
WHY?
Well for me, too often I see operators stopping their trains to check points etc before proceeding, imagine how the real world of railways would go if drivers ignored the signals & what position they were in & stopped at every set of points to check them, before proceeding. Yes! there were circumstances when signals had to be challenged, at point of no return signals being passed in the wrong indication, but it goes deeper than that.
As Essence is based on a period that spans the years from around beginning 1955 - end 1957 set somewhere in a slopes area in NSW, on single line, the signals were to be of the Lower Quadrant type. Looking at was around at the time I found the available offerings wanting, & having seen on one of the blogs I follow some nice signals, I decided to get Dale Richards from the McKenzie group to build signals for me, so far the area at Moblayne has received all the signals bar 2 needed for operations, not all are placed in situ owing to other work to be finalised first, but some photo's here show the down end of Moblayne with signals in place.
Signals in situ, for down trains approaching Moblayneis the outer home, a fixed distant arm, with operating home type arm, provided protectection for the Moblayne saleyards/abatoirs sidings, working willl be conducted by the Moblayne shunting engine with a key/staff operation that will place the signal at stop.
The home signal for Moyblayen is not shown but is the same type as shown for the Up Home.
Down starting signals at Moyblayne,Main line, Loop & Yard. Lighting wires are in the way at the moment. In the distance to the left of the water tank can be seen the rear of the Up Home
Main line Starter is cleared for a holiday passenger special to depart
A closer shot showing the Up Home & water tank for Loco, the tank itself has been weathered using soft pastel chaulks.
The Up Home signal for Moblayne, a mirror reverse signal is also used for the Down Home signal, a display board will set the signals to show how they are to be read by drivers, from Left to Right for which road,, Right hand high is main line, Left hand high is loop & bracket signal entry to yard area.
Subscribe to:
Posts (Atom)