While I am thankful for a reasonably good memory of my time on the NSWGR which includes seeing pretty standard patterns in work & train operations, I am glad also of the photo's that I took along with old super 8 movie film to record a lot of the passing era. All of this is a help as I try to portray what I can in the layout, however even with all of the memories, & my own photo's it really is limiting when considering the overall workings of the NSWGR both in my time & the preceding years to which I am modelling.
As a result of those limitations, I watch out for relevant books that fill in a heck of a lot of missing details. For me, & I think for anyone seriously looking at developing their layouts a decent library is essential, after all if one sits down & does their sums on how much they spend on the layout & then filling it up with all the items they need & want, in the end the layout will generally reflect the amount of research that is done regarding what they are trying to achieve.
I actually believe that its just as vital to spend a proportion of money, be it a percentage of what is spent on the layout itself on a good support library, for that reason I am glad that over the years my library has evolved with a fair few books that no longer are in print, & even now still get a good go over, certainly some more than others.
Of these books, I have generally enjoyed all the Train Hobbies Landscape books on the NSW system, well those that deal with the era I am modelling anyway, in particular those dealing with stations, loco depots, & the various branch lines each are scanned fairly often in order to pick up the small things that are featured in the overall photo.
I have just received the latest branch line book Volume 2 of the Harden - Blayney line, & just like the first one its a wonderful book of photo's, all bar one are clear & well focussed to capture a wonderful amount of detail that can be included in a layout. In the section on the Grenfell branch there are 2 photo's that stand out for me, the first owing to what is really quite rare, & that is an S truck with a load of bailed wool without any tarp over it, & on a train ready to depart. I have to admit to never having seen such a thing, nor a photo of it happening.
Wool loads simply had to be tarped in order to protect the wool from the weather, although its likely that tarps were not available at Grenfell so it would get tarps at possibly Cowra before the night forwarding journey took place.
The other photo was one of Grenfell station itself, taken highish, & from the road side of the station, & I was amazed at the neatness of the station, while photo's show how neat & tidy the station at Wattamundra was, here is the terminus of a branch line that is indeed a picture of classic beauty. It looks not that long after being painted in a pale green with railings & other framework picked out in clean white trimming.
Except for the weatherboard construction, & the definite NSW rural scene, with an old truck at the station & a 30T in the yard, it would have looked not out of place on some English countryside layout.
These 2 photo's jumped out at me, in just the first skim through, now I sit down & sift through & take in the scenes at leisure.
Highly recommended.

Meitian - Mongolia 2012 a lovely small village, where steam still existed, and with our heat ATM, this scene looks inviting still CHRISTMASS GREETINGS TO ALL
Tuesday, 18 June 2013
Saturday, 8 June 2013
Practice makes Perfect----- Until!
Around 10 years ago I did a 12 month digital media course at Tafe, at the time Digital photography was still very much in its infancy & 2 megapixel cameras were the talk of the town, the happy snappy cameras & then the first real mobile phone cameras were the teenagers delight. Each of the students were assigned a specific major assignment & coped the wonderful subject of, Will Digital Cameras replace film & slide camera as the primary medium for professionals.
At the time, all high end cameras were still film based, even video cameras that were then High resolution, or Broadcast Quality 720 recording. The assignment took 8 weeks to complete & based on every review, & professional area of research I looked into, the conclusion that I came to, which was agreed by the lecturer & others, was that until SLR, Large Format & other cameras were able to produce a minimum of 20 full megapixels, & not the shared or compressed types as found in the snappy happy & mobile phones types, then film would remain the choice of high end & professionals.
At the time I had not long purchased a new Film SLR to replace a 30 odd year old camera, & wow it was great, a couple of pro's I know also had invested in brand new top line body only Nikons at around $4500 each, then the lenses had to be taken in to account. Fast forward to a mere 4 years after that when 6 & 8 full megapixel DSLR's were on the market & they changed, in 2008 I obtained a Pentax DSLR of 10 megapixels, two years I obtained a 12 megapixel Pentax K7 & both were excellent the K7 is brilliant for outdoor & proper photographic work,
Last year my wife's old Finepix tossed it in & I obtained a Canon SZ230hs in a run out deal for $189.00 it came on the market at over $400.00 primarily it has 12 megapixels & can do HD video. This is now very much my camera of choice for indoor & taking photo's of the layout as it has a lot better multi focal areas than the K7 that I got on special in 2009 at $1500.00 Duty Free.
Thus to my heading.
I have never considered myself a brilliant scratch builder, in fact pretty standard fair & often my kit building skills have not been much better. Over time though I believe the skills have progressively improved, While I am not one that seeks to ensure every item built is pristine, I try to ensure they are all aligned well & where possible no gaps & then fill them as required. The closer they are to the eye, & therefore being able to detect problems, the closer attention I pay to them. OTOH, if a building is more to be part of a backscene such as along the wall of both Akuna & Moblayne, I tend to be a little more relaxed in what I do.
In saying that, I do not throw stuff together, & do take time, I do not generally use an air brush on such buildings, as even Akuna which has a depth of 500 mm's its hard to pick up slight blemishes, & even when viewed at basically elbow length. On those two areas, I am planning of having 2 pubs each, fairly typical for many small to mid sized town areas, & I have set about building each one of them in a different style, that in may ways is an ode or representation of the many pubs across NSW & perhaps Australia, I would certainly not try to do one of the great Queenslander 2 story verandah type pubs, owing to the intricacy of them.
My first attempt was to convert a Walthers Cornersone Merchants row building into the corner 2 story pub. The following two photo's show the initial stages of the conversation.
 The above photo was taken using the old Pentax & still some bits had to be added such as some of the windows & door fittings along with the verandah covering. I was fairly happy with the work at that point as it was a fair amount of work involved.

The problem though, as seen in the top photo is that the building is quite large, in both length & depth, which is really too much, I thought long & hard about what to do & I was thinking of punting it, then I thought of cutting it down, I would have preferred to cut the length back, however it would have spoilt the overall look & feel for it, Thus the decision was made to cut it back on the side or depth, so armed with a modellers hack saw, I worked out where to cut. Here under are the starts to the project, & sadly the new camera shows up some bloopers that are not noticed when the building is towards the rear of the benchtop, in fact 4-500 mm its not seen


This hotel will be located at Moblayne with the shortened side against the back wall.
Here are 3 shots of the pub under light, The sad part is that despite a lot of time & work taken in the project & the hardest one I have yet down, when the daylight photos are viewed, the painting looks a shocker as do some of the finishing touches especially the awnings & facias, but now in place & some redoing, they will come up ok, & the presented photo;s will be a bit further back.
The samples here are just test shots with a battery of 2 banks of warm white lights cut from a reel of SMD 3528 strip lights, I do want to darken them a bit, also once some more detail is added inside the pub, the roof will be secured.


At the time, all high end cameras were still film based, even video cameras that were then High resolution, or Broadcast Quality 720 recording. The assignment took 8 weeks to complete & based on every review, & professional area of research I looked into, the conclusion that I came to, which was agreed by the lecturer & others, was that until SLR, Large Format & other cameras were able to produce a minimum of 20 full megapixels, & not the shared or compressed types as found in the snappy happy & mobile phones types, then film would remain the choice of high end & professionals.
At the time I had not long purchased a new Film SLR to replace a 30 odd year old camera, & wow it was great, a couple of pro's I know also had invested in brand new top line body only Nikons at around $4500 each, then the lenses had to be taken in to account. Fast forward to a mere 4 years after that when 6 & 8 full megapixel DSLR's were on the market & they changed, in 2008 I obtained a Pentax DSLR of 10 megapixels, two years I obtained a 12 megapixel Pentax K7 & both were excellent the K7 is brilliant for outdoor & proper photographic work,
Last year my wife's old Finepix tossed it in & I obtained a Canon SZ230hs in a run out deal for $189.00 it came on the market at over $400.00 primarily it has 12 megapixels & can do HD video. This is now very much my camera of choice for indoor & taking photo's of the layout as it has a lot better multi focal areas than the K7 that I got on special in 2009 at $1500.00 Duty Free.
Thus to my heading.
I have never considered myself a brilliant scratch builder, in fact pretty standard fair & often my kit building skills have not been much better. Over time though I believe the skills have progressively improved, While I am not one that seeks to ensure every item built is pristine, I try to ensure they are all aligned well & where possible no gaps & then fill them as required. The closer they are to the eye, & therefore being able to detect problems, the closer attention I pay to them. OTOH, if a building is more to be part of a backscene such as along the wall of both Akuna & Moblayne, I tend to be a little more relaxed in what I do.
In saying that, I do not throw stuff together, & do take time, I do not generally use an air brush on such buildings, as even Akuna which has a depth of 500 mm's its hard to pick up slight blemishes, & even when viewed at basically elbow length. On those two areas, I am planning of having 2 pubs each, fairly typical for many small to mid sized town areas, & I have set about building each one of them in a different style, that in may ways is an ode or representation of the many pubs across NSW & perhaps Australia, I would certainly not try to do one of the great Queenslander 2 story verandah type pubs, owing to the intricacy of them.
My first attempt was to convert a Walthers Cornersone Merchants row building into the corner 2 story pub. The following two photo's show the initial stages of the conversation.


The above photo shows the building all but finished at the first stage, but using the new higher pixeled Canon camera. & this is where the heading comes in especially the UNTIL! this camera with higher resolution really picks up every single imperfection in the models construction & the other little areas of problems especially with the painting, I chose to carefully hand brush rather than air owing to the pain in try to mask the very fiddly & fragile styrene posts etc. But as the building will go against the wall at Moyblayne, which is 1210 mm away from the front, I am happy with it.
That is the great part of these modern digital cameras in that they show up the errors, which mean the builder needs to much more careful in his ""practice"", sure time will help, but in not every area. Thus the camera could be said as being picky'er than the eye.

Above, The first cut was to remove basically half the depth of the side of the pub, I had to gently cut the two floors away, as well as the internal detail I had put in before, as well as needing to look at how the bottom floor which was the public bar would end up, well now its the smaller Saloon bar. The other fiddly part was to cut through the verandah, roof & the footpath as it took some time, patience & care

The old side wall which went to the same depth as the other side, also had to be cut down & refitted to the side.

#3 With this stage completed, which included further cutting down of the remaining part of the side wall, & made it fit into the return area for the saloon bar, a short wall had to be also cut in on the inside to provide a continual bar wall in the saloon. The Salmon pink brick sheets were Slaters products, very thin & flexible to work with but as the Merchants row was basically a 4 wall job, & all open inside, a lot of extra work was need to make the pub into a more typical accommodation type as seen in many areas such as & similar to the old Signal Hotel at WCK.
This hotel will be located at Moblayne with the shortened side against the back wall.
A fair bit of work is still to be done, but the new camera certainly picks up the UNTILL bit referred to.
I have now put the project to the side in order to concentrate on building from scratch a single story corner type weatherboard pub. Having no plans to go by, & only some recollections of several old style pubs across NSW that had 2 bars & an oudoor beer garden, as well as the cold room was a free standing room out the back as were the toilets, it is to be very much the beaten old drovers/stockman workers pub, with no accommodation.
It has 2 bars, only, & like all my buildings they like this one will be internally lit.
The samples here are just test shots with a battery of 2 banks of warm white lights cut from a reel of SMD 3528 strip lights, I do want to darken them a bit, also once some more detail is added inside the pub, the roof will be secured.


Friday, 24 May 2013
A quick update on the scenery & redo of the short section between Coxes Gully & Nullo, with the addition of raised facia, embankment grassing & some trees/brushes I am happy with the way its turned out, problem is the weather being windy & rain affected has blown a lot of leafs on the track, hardly noticeable with the naked eye but gee the camera has picked it up.
The photo's are taken pretty well at the same spots as the post on 18th April, so some comparisons can be made.
For me much of the work is slow but until the surgery is done things will be getting slower around the layout though.

Looking from Nullo down the grade to Coxes.

Mid way down the grade, following wind storm, just as well I didn't put in any umbrella grasses

Looking towards, Coxes station with main & loop, yard to the right

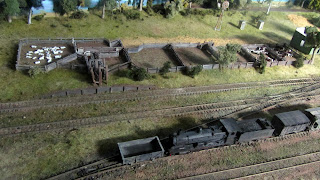
The above photo shows a TOR 32cl with an experimental S wagon attached to the front, & ready to do some shunting at Coxes Stock handling facilities, gotta get the wagons in to get the sleeping stock up & out.
I have done a bit of adjustment on an old Euro type coupler that came as spare in an Austrains 36cl, by cutting away much of the plastic part that holds the D type metal outer coupling ring in a fairly horizontal position, allows the link to droop a little, but not enough to hold it onto the hook on the engine.
I then bent the ring downwards, which means I have to lift the ring to drop over the hook & that sits nicely in place. With careful shunting & pushing the wagon, the ring ends up being pushed up & off the hook & onto the buffer beam, but with the bend in it, when eased back the link drops back onto the hook with no problems.
Initial tests have been ok, but I will need to have one located at both Coxes as well as at Akuna for the use of the shunting engine there off the school train, so some more experimenting is to take place,
If this ends up working, it will mean that if I am to run double headed steam, I will simply swap the kadee out for the modified Euro coupler for the assistant engine. Experiments continue.
The photo also shows the almost completed area of the stock handling yards which includes resting type facilities.
The photo's are taken pretty well at the same spots as the post on 18th April, so some comparisons can be made.
For me much of the work is slow but until the surgery is done things will be getting slower around the layout though.

Looking from Nullo down the grade to Coxes.

Mid way down the grade, following wind storm, just as well I didn't put in any umbrella grasses

Looking towards, Coxes station with main & loop, yard to the right

Looking from Coxes toward Nullo.

A pet dislike of mine is having Kadee couplers on the front of loco's that did not have them in regular service, & only had hooks, had me thinking towards finding a way to keep the hook & still shunt wagons on the loco end. My thoughts went to the old shunters match trucks prior to the many conversions, which in the main were any available S wagon, sometimes they were wagons condemned for main line working or restricted as they waited on works attention.
The above photo shows a TOR 32cl with an experimental S wagon attached to the front, & ready to do some shunting at Coxes Stock handling facilities, gotta get the wagons in to get the sleeping stock up & out.
I have done a bit of adjustment on an old Euro type coupler that came as spare in an Austrains 36cl, by cutting away much of the plastic part that holds the D type metal outer coupling ring in a fairly horizontal position, allows the link to droop a little, but not enough to hold it onto the hook on the engine.
I then bent the ring downwards, which means I have to lift the ring to drop over the hook & that sits nicely in place. With careful shunting & pushing the wagon, the ring ends up being pushed up & off the hook & onto the buffer beam, but with the bend in it, when eased back the link drops back onto the hook with no problems.
Initial tests have been ok, but I will need to have one located at both Coxes as well as at Akuna for the use of the shunting engine there off the school train, so some more experimenting is to take place,
If this ends up working, it will mean that if I am to run double headed steam, I will simply swap the kadee out for the modified Euro coupler for the assistant engine. Experiments continue.
The photo also shows the almost completed area of the stock handling yards which includes resting type facilities.
Friday, 26 April 2013
A follow up of a blog on the The Nimmitabel Extension blog site regarding train consist forms X2010, & how we can adapt these systems to the modelling arena, the following is what is called a Teleprinter load consist of a train I worked from PTK to Moss Vale.
The train was normally an empty Limestone train but in those days they were also used to forward both Petrol, Fertiliser & sometimes an odd wagon of steel for Southern line destinations.
The normal X2010 as made out by the guard showed the train consist from the Brake Van through to the loco's, thus vehicle #1 on the X2010 was the Van & then numbered upwards to the front.
The wagons for destinations past MV, were detached there & then picked up by the next suitable train to be forwarded to Goulburn, where the wagons would have been then put onto appropriate trains to the destination or next point for transit.
In this case the DOT was diesel fuel for Glbn Loco & would be taken there by the South yard shunting engine. The Bomballa fert for the next goods train to Cooma/Bombala . They would have been left together for that train.
The wagons for Wallendbeen would have been remarshalled together & those for Boorowa also left together, & despatched on the first pick up or slow goods service south.
The Boorowa traffic would have been marshalled in the lead of the other traffic, in accord with the drop off locations along the way, as such if there had been traffic for Yass they would have been on the lead, & then the Boorowa. Train control would also know how much loading was at Harden & Galong for the branch, which would mean the fertiliser wagons could have been shunted off at Galong for attaching to the branch service.
The exception to that would have been if the wagons would have remained in Galong yard for any extended time to prevent interference with them, so would have been taken to Harden.
When looking at pick up trains for modelling purposes, the idea I will be using is to list 3xS, 2 x K, 1x MLV, 2 x RTC for Sleigh, 1x RTC for Union Oil etc at Akuna, if empties were required for Nullo Saw Mill, a list showing, 1xMLE, 2xS, & so on. The train consist & make up would have the wagons marshalled on the train with the first detach closest to the locomotive.
Any Loaded RTC, also required at least one wagon between it & a steam locomotive, also regarding Oil Depots, there was usually an engine stop board located just inside the terminals gates which were always shut except when being shunted, thus a sufficient number of wagons needed to be positioned between the engine & RTC for spotting.
An oil depot on the down side of the western line not far from Katoomba was shunted by 46cl but the O/head only went in as far as the gates, thus the wagon had to be marshalled on the train with at least 3 S trucks between it & the 46.
Hope this is of help.
008….PT
KEMBLA NTH…. 6/2/80…1405HRS
DS
WOLLONGONG
METS
106/99
1/S
SYCO
FREIGHT
53
SOUTH
GOODS CONTROL
GOUL
GOCO
GOULBURN:
MEDWAY=
TRAIN
NO.663, EMPTIES/FERT. TO MOSS VALE DEPARTED AT 1400HRS
GRD GREIG PT
KEMBLA 1225HRS
DRV HUSSEY PT
KEMBLA 1250HRS
ENG NO.42108/42213.
JHG 34036 23 PT KEMBLA MOSS
VALE USE
17 CH PT
KEMBLA MEDWAY M/T
1 HCH 306 SAME
DOT 928 60 PT KEMBLA GOULBURN
OIL
S 1723 24 SAME BOORAWA
FERT
S 16002 24 SAME
S 6436 24 SAME
S 15369 24 SAME
S 2467 24 PT KEMBLA WALLENDBEEN
FERT
S 14205 24 SAME BOORAWA
FERT
S 14079 24 SAME WALLENDBEEN
FERT
S 9763 24 SAME
S 15538 24 SAME
S 12739 24 SAME
S 12978 24 SAME
S 4180 24 SAME
S 12955 24 SAME
S 3318 24 SAME
S 14059 24 SAME
S 1416 24 PT KEMBLA BOMBALA
FERT
S 6790 24 SAME
S 8883 24 PT KEMBLA BOORAWA
FERT
TOTAL LOAD=38=58 AT
839 TONNES.
ASM PT KEMBLA
NTH 1415HRS
Thursday, 18 April 2013
As I wait on a couple of items to finish off Goxes Gulley I have been progressively working towards finishing the section of track between Coxes & Nullo Mountain loop & Mill siding.
With the up side embankment receiving a fair degree of grassing & tree rearrangement the old down side with the facia board left a lot to be desired, not only was the arrangement too low but owing to the perfect elbow height it was all but impossible to maintain any tree or shrub along the low cutting form along that side.
The other aspect or reason is that when in Sydney, the old layout had a similar gradient with a sharper curve as well as a high side to facia which created a very different & realistic exhaust echo that bounced off the higher facia side from sound equipped locomotives as they ascended the grade. Hopefully with this height increase a similar affect will also be created, although it is not as likely to be as great.
 The above photo shows the original height of the down side of the section.
To enable a better embankment on that side as well as raised the facia to a better height was going to need a degree of work & uncertainty if it would work or not. As much of that part of the layout & edge had already been formed & was strong I did not want to remove it, so the solution was to place some 18mm spacers on the outside of the existing facia, then cut another piece of 3mm ply & screw & glue to the outside. Then fill the gap with foam off cuts to take the new plaster.
The old saying of oils aint oils Sol, applies to the ply as well, the previous ply I had used on the facia had quite nice smooth sides to it, but the new ply was only smooth on one side with a fair degree of roughness about it.
To get the strength & height I cut the ply to the same height as the existing facia & added an extra 180mm in height to the side. This allowed me to securely screw & glue the new facia to the spacers & provide the extra height without worries, as radius is quite tight, with the 2440 sheet enough to almost go completely around the outside of the climb, & only another short section needed to cover the distance.


With the up side embankment receiving a fair degree of grassing & tree rearrangement the old down side with the facia board left a lot to be desired, not only was the arrangement too low but owing to the perfect elbow height it was all but impossible to maintain any tree or shrub along the low cutting form along that side.
The other aspect or reason is that when in Sydney, the old layout had a similar gradient with a sharper curve as well as a high side to facia which created a very different & realistic exhaust echo that bounced off the higher facia side from sound equipped locomotives as they ascended the grade. Hopefully with this height increase a similar affect will also be created, although it is not as likely to be as great.

To enable a better embankment on that side as well as raised the facia to a better height was going to need a degree of work & uncertainty if it would work or not. As much of that part of the layout & edge had already been formed & was strong I did not want to remove it, so the solution was to place some 18mm spacers on the outside of the existing facia, then cut another piece of 3mm ply & screw & glue to the outside. Then fill the gap with foam off cuts to take the new plaster.
The old saying of oils aint oils Sol, applies to the ply as well, the previous ply I had used on the facia had quite nice smooth sides to it, but the new ply was only smooth on one side with a fair degree of roughness about it.
To get the strength & height I cut the ply to the same height as the existing facia & added an extra 180mm in height to the side. This allowed me to securely screw & glue the new facia to the spacers & provide the extra height without worries, as radius is quite tight, with the 2440 sheet enough to almost go completely around the outside of the climb, & only another short section needed to cover the distance.

Nullo Mountain end, showing the single join in the new facia panel with old low embankment that showed the old height.

In approximately the same location as the first photo in the main part of the post but looking in the down direction.

Bottom of grade & looking towards an incomplete (still) Coxes Gulley

Looking back towards the descent from Nullo from the down end of Coxes.
Since these photo's have been taken I have put down the base for the new embankments on the down side, given the background another coating of the blue sky, & started the base scenery for it. Next steps will be to add grasses & then the final sky colours prior to the trees & scrub to go in, another couple of weeks steady work,
Since these photo's have been taken I have put down the base for the new embankments on the down side, given the background another coating of the blue sky, & started the base scenery for it. Next steps will be to add grasses & then the final sky colours prior to the trees & scrub to go in, another couple of weeks steady work,
Monday, 25 March 2013
A short new post after some time & being away for a few weeks, & not a lot happening on the layout at the moment.
The header photo is put up for the benefit of those looking at yard lighting arrangements, a topic that has been raised on the AMR Yahoo group recently.
Generally speaking some locations that had mid sized yards, while lights were in position most of them were turned off at night when no shunting or train arrival/departures took place, some lights remained on over any foot crossings such as found at Narrabri West & also at Wellington.
Dubbo in itself was also a bit unusual owing to there being essentially two yards, the one to the left of the photo & on the town side of the main line, had quite a few roads as it served the large goods shed as well as other sidings. The area where 3055 is shunting leads to what was storage sidings, as well as petrol terminals on the right hand side of the depot.
Trains departing for the west could be made up on the loop line which was also the arrival road for trains arriving from Molong or Wellington, or they could be made up on a road next to loco, & depart from there as well. Trains to the East were usually made up in the same roads that next to loco or the dead end storage roads where the mail train carriages were placed.
Dubbo was busy enough in the 60's to have 2 x 30T used on the day & afternoon shunters, one performed the duties of the goods shed area, while the other one shunted the other side, plus as needed go to the Abatoirs or stock yards. There were also several sidings around the triangle on the eastern end.
Looking at the photo in regard to the overhead yard lights, there is a sign of consistant spacing especially noticed in the goods shed yard, on the other side the lights for the depot also illuminates some areas as well, likewise on the depot side is both the consistancy of the placings down at the dead end sidings but alse there is the less regulated placings based around the lights of the depot.
During many of my country visits in the 60's, it was pretty well common to find that yard lights, & the main platform lights were turned off when not required. During that time guards were issued with the same orange types of battery operated hand lamps that were found on Diesels, likewise the head shunters were also issued with them, these lamps threw out lighting that allowed them to be used as torches to illuminate walking areas that the old kero types were unable to do, a huge improvement. But meant that many locations kept the yard lights off unless shunting was required.
At stations, even when they were manned, only the building & awning lights were left on, the exceptions being when a passenger train was stoping or there was a water column at the end of the platform & it was required for loco purposses, often such a light had a switch on it which was turned off when watering was completed. These lights were also positione in such a way as to assist with the raking out & de ashing of steam loco's.
Edit in: A side item to note in regard to the working of Dubbo yard & was found in many other yards around NSW was the use of single pole throw point handles as seen in the header photo. Not all yards used the commonly seen throw over & ball type hold down levers, which often caused derailments when they did not drop correctly, or not thrown when a wagon trailed through them.
The pole points were spring loaded & when a wagon, loco or train ran through them, the blade would throw to that road, thus preventing a derailment when the wagon/loco would reverse while on the points. The point spring & throw mechanism was hidden under the metal safety cover.
While I have some of the Caboose industry ground throws that can be made to operate, I believe they are too large for NSW, even for appearances only, but these types of levers & cover could be readilly hand made & would authentic in yard areas.
 A short of close up of the point lever. Apologies for the quality as the original slide needs rescanning in higher resolution. One of those other jobs to be done.
The cover was in three sheet metal sections, sloped to ground level each end rising to the main cover plate. The lever handle was set into a spring loaded mechanism, so that it was pulled in the direction for blade reversal after which the handle sat a semi loose or slopy position as it was very much moveable by itself. You did not want to be standing close to the handle when the points were reversed by a wagon running through them, as the handle gave a pretty quick slap in position.
The header photo is put up for the benefit of those looking at yard lighting arrangements, a topic that has been raised on the AMR Yahoo group recently.
Generally speaking some locations that had mid sized yards, while lights were in position most of them were turned off at night when no shunting or train arrival/departures took place, some lights remained on over any foot crossings such as found at Narrabri West & also at Wellington.
Dubbo in itself was also a bit unusual owing to there being essentially two yards, the one to the left of the photo & on the town side of the main line, had quite a few roads as it served the large goods shed as well as other sidings. The area where 3055 is shunting leads to what was storage sidings, as well as petrol terminals on the right hand side of the depot.
Trains departing for the west could be made up on the loop line which was also the arrival road for trains arriving from Molong or Wellington, or they could be made up on a road next to loco, & depart from there as well. Trains to the East were usually made up in the same roads that next to loco or the dead end storage roads where the mail train carriages were placed.
Dubbo was busy enough in the 60's to have 2 x 30T used on the day & afternoon shunters, one performed the duties of the goods shed area, while the other one shunted the other side, plus as needed go to the Abatoirs or stock yards. There were also several sidings around the triangle on the eastern end.
Looking at the photo in regard to the overhead yard lights, there is a sign of consistant spacing especially noticed in the goods shed yard, on the other side the lights for the depot also illuminates some areas as well, likewise on the depot side is both the consistancy of the placings down at the dead end sidings but alse there is the less regulated placings based around the lights of the depot.
During many of my country visits in the 60's, it was pretty well common to find that yard lights, & the main platform lights were turned off when not required. During that time guards were issued with the same orange types of battery operated hand lamps that were found on Diesels, likewise the head shunters were also issued with them, these lamps threw out lighting that allowed them to be used as torches to illuminate walking areas that the old kero types were unable to do, a huge improvement. But meant that many locations kept the yard lights off unless shunting was required.
At stations, even when they were manned, only the building & awning lights were left on, the exceptions being when a passenger train was stoping or there was a water column at the end of the platform & it was required for loco purposses, often such a light had a switch on it which was turned off when watering was completed. These lights were also positione in such a way as to assist with the raking out & de ashing of steam loco's.
Edit in: A side item to note in regard to the working of Dubbo yard & was found in many other yards around NSW was the use of single pole throw point handles as seen in the header photo. Not all yards used the commonly seen throw over & ball type hold down levers, which often caused derailments when they did not drop correctly, or not thrown when a wagon trailed through them.
The pole points were spring loaded & when a wagon, loco or train ran through them, the blade would throw to that road, thus preventing a derailment when the wagon/loco would reverse while on the points. The point spring & throw mechanism was hidden under the metal safety cover.
While I have some of the Caboose industry ground throws that can be made to operate, I believe they are too large for NSW, even for appearances only, but these types of levers & cover could be readilly hand made & would authentic in yard areas.
The cover was in three sheet metal sections, sloped to ground level each end rising to the main cover plate. The lever handle was set into a spring loaded mechanism, so that it was pulled in the direction for blade reversal after which the handle sat a semi loose or slopy position as it was very much moveable by itself. You did not want to be standing close to the handle when the points were reversed by a wagon running through them, as the handle gave a pretty quick slap in position.
Sunday, 10 February 2013
Its been a while since updates, & this one will be likely the last for a while also, as I wait on more specialists appointments, treatments & most probable further sugery on my back, which is likely to be fusions at 3 levels. Not looking forward to it but hopefully it will rid me of the various refered pain that is getting worse.
This has meant any progress on the layout has been minimal, with experimentations taking place using the old broken Super Trees armetures that I discovered in a bag from our move. The worst part of all of the breakages is that there has been little of the larger armatures that have stayed intact, meaning a lot of short bits & a fair degree of glueing them together.
Over time I have concentrated on mostly the larger gum type trees, but the reality is that in many areas of the country & NSW there is such a huge variety of trees that also create interesting features for a model railway layout. A comment by one of the members of our weekly group made me sit up further & thinking much more along the lines of other than gum type trees.
This fellow is from the U.S & worked as a signalman over there, & he mentioned that in all his travels he has never seen anywhere else in the world like the Australian bush landscape, it does not matter where you go, its impossible not to take in the depth of the forests, & how little distance into them that you can see, While the large trees of many variations stand out, its the incredible variety in the undergrowth that is amazing, meaning that its rare to be able to see much deeper than 20-30metres as beyond is nothing but trees, & you have to be almost through them before being able to see open areas.
Thus my experimentation with the armatures & different flocking & scenery items has taken up what time I can get to the train room. The following are first attempt samples of using the small Super trees using differet types of scatter materials.
The first 4 all comprise of various ground foams, with 1, 2 & 3 being a fine JTT type., while 4 is Scenic Express
1. 2.


3. 4.


5. 6.

8.


# 8 is a further experiment with old Willow tree experiment I did in Sydney, the low one next to the gum trunk. It came up ok for the distance & filled in a hole, this tree has old foam turf underneath with the Naturex finely sprinkled over the top.
9. 10.

11


On a final note, I do not know what is going on with blogger, seems they have fixed the photo download problem but, the huge gap that has shown up in this post is not showing in the main page, seems something is amis with the formatting.
Subscribe to:
Posts (Atom)