Tuesday, 1 July 2014
Hibernation
On the same day as header photo, 3651 hauls the up midday flier through Ourimbah station. The busy Pacific highway can be seen at the left top corner of the photo
As close to the same position as the main photo of 1964.
Moving to the Eastern side & crouching down, more is able to be seen of the old Highway, homes, shops etc, & even traffic lights, in around a kilometre & a bit, there are now 4 sets of traffic lights & roundabout, dual lanes to just past those visible towards the front of the 2nd photo. In 1964, it was one lane each way, all the way from Gosford to north of Wyong.
Essence has gone into a bit of a hibernation period for a while, as work duty calls upstairs. The amount of work that the layout has taken up, especially in time has meant a lot of other work that has been in need of doing now has reached a point that to leave it much longer will make some relatively simple work, much harder in the future.
Like many I do not especially like house painting, but its certainly not that bad a task if you can tackle it sooner rather than later. When we moved here just over 4 years ago, it was obvious that the inside paint really is the original, meaning that its now around 15 years since it was painted & it was looking quite scruffy. Painting is not that bad when the base is ok, & better to do in the cooler months, so my target this year is to get as much done as I can, & the worst part I think will be the shifting around of furniture to get needed access. With this painting near finished I am looking forward to getting back to the layout, things have to happen as I am hosting a meeting here in 3 odd weeks so its near panic stations to tidy all things up
The aspect that I liked about trying to replicate the older NSWGR & in the period just 8 years short of when I started on the job, was not just the variety that was found on almost every train & their consists, it was also the infrastructure in & around the lines, stations, depots & townships. If I have a sorrow its that I never got around to taking photo's of a lot of that stuff.
Working on steam in those days was not the pleasant job that many like to think of, when the good old days are spoken of, thus the bush sojourns ever diminished as the novelty wore off, likewise as steam finished up, along with other interests developed, railway photography even trains went to the back burner without a gas connection. Besides, the system was always going to survive wasn't it.
As I go through some of my slides I remember my first decent camera was a 35mm Voightlander, top camera brand & produced nice shots, problem was that it was not an SLR, the sighting was via a top eyepiece with a line around it, indicating the frame that would be taken, also a manual, guess work focussing set up, I used it for around 3 rolls of film before trading it in & getting a Pentax S1a SLR, which lasted me for years.
On the day I visited Ourimbah as shown in the head photo, I used up a roll of B&W film before the slides, sadly the B&W film is one of many lost rolls, Super 8 movies & other documents from the time, during the move from Werris Creek. On that day a Friday, there was a vintage car rally somewhere up North that saw a stream of old vehicles, passing by along the Pacific Highway, the sorrow is that when one looks at the 1964 photo & compare to the other twoe taken in early July this year, its easy to see the changes.
Looking at such older shots, it certainly reminds of a time past when things were much quieter & easy going, not much pressure placed on the individual, meaning life was quite pleasant, & one that certainly did not the rigidity of rules that are ever present these days. Even if the wires were not there or the trees in the latest scene, its easy to see the increase in road traffic on a highway that is no longer really part of the primary interstate road network. Imagine having to travel from Sydney to Brisbane today, going along the old Pacific highway, How's your patience? Ahh! no road rage back then either.
Finally, 3 shots of Moblayne following some town construction, & the small extension to the cuttings near the depot.
Sunday, 8 June 2014
Brick pit
In the past I set myself a goal of going to 2 NSW exhibitions a year, they being the annual ones put on by the Epping Model Railway Club now held at the old Brickpit at Thornleigh, on the June long weekend. The brick pit comes back to my memory as one of those midnight shunting locations on up pick ups, usually with K wagons rather than other types.
Another siding nearly opposite the Brickpit called Gonoroo, & often by a name near to it, was also a regular shunting location that took Barley & other grains for processing. The one big memory of the area was the stench that came out from a company called Harris or similar that was from memory associated with the grain unloading facility caused the smell as they made flavourings for many products. The brick pit was shunted on the up with Gonoroo on the down.
The other exhibition is the annual one held at Liverpool over the October long weekend, while this exhibition is pretty well known the Brickpit one is quite so, but is certainly gaining in popularity. Owing to the amount of pain with my back, from end of 2012 I was unable to get to either exhibitions last year, & something I missed a lot. So with surgery last September I was really looking forward to this years calendar & getting to both of them this year.
One thing about health is when its bad its great when you get better & back to some sort of normality, the trip to Canberra over Easter was my first such venture since the operation & while I passed with flying colours, the trip yesterday to the exhibition showed just how far I still have to recover, even though I spent around 4 hours there yesterday, which really is nothing by the end, I was glad to get home & the hours drive up the M1 was a mighty relief for me when it finished.
I am not a person who takes photo's at exh's, & is something I should reconsider but my past efforts have not been as good as I had hoped so apologies for none in this post.
I have to say that the Epping clubs exhibition really sits on the top rung of exhibitions, sure its hard to beat the big brother Liverpool for sheer volume & size, which also equates to numbers, meaning crowds of people, especially on the first day. My wife Julie came down with me & we arrived at around 0910, able to get a park under the hall & even then with near an hour to go the line was out to the footpath so we go in for a cup of coffee, & gee I have to say how much I dislike the auto machine coffee, next year is a thermos thank you, although the snag sandwiches even at the price go down nice.
The line started to move around 10 minutes early, so we sit for 20 minutes to wait for the clearance walk out & see the line down at the underneath car park entry, near as much as big brothers line. My thoughts immediately turned to the dreaded crowded aisles & stand issue but, what a wonder when inside out of the wind it was a wonder at how many people could get into this hall without blocking anything. One lady on the way as she walked to the hall said she had to drive around for over 1/2 hour for parking, which is likely the biggest issue facing this location.
While Julie thoroughly enjoyed herself even building a small module at the kids scenery clinic, well done NMRA members who were much supported by those in the CCWN Wednesday nighters who I enjoy the company of & membership in. She left for ferry rides in the city after 1 1/2 hours with a new found enthusiasm for my modelling & seeing what goes on, augers well for the future.
My overall time at the exhibition before my back started to really complain was 4 odd hours & leaving there around 1430. While it was nice to see the arrivals of new models for the first time, the OTM TRC's, amongst their other collections, the improved models in the Austrains range, taking in the new samples of BHG/SHG/ Loaf of bread EHO's, new RTC's from SDS, seeing items on the Southern stand, & the very nice 43cl sample from Auscision, perhaps the model that captured my greatest drool points was the O gauge Garatt.
What an awesome looking model, but I'm blowed if I intend to pull down the HO layout & go into a new venture to get one, including the other bank busters on display.
Moving to Eureka's stand I noticed that their steam models have moved away from the original plug connectors between engine/tender that provides the electricals & take on the load bearing from the motored engine, now the wiring has a plug & metal connector as found on the TOR 32cl, which to me is a much better setup, although it means 2 connections to play with, I like the idea of the stronger set up like this.
Being a mid 50's modeller, my hope is to see the Eureka 40cl arrive before long, but they seem to be plagued by the latest drama's at the old SDK factory, this has apparently been resolved so one can only hope to see this long awaited model arrives soon, the same with the Austrains G/BL & 81cl. I also thought the samples of the G wagon from Eureka looked very nice as well.
The one area of layouts that continue to impress is the O gauge in both the Arakoola & Spicers Creek, the latter the child of Garry Spencer-Salt from MRRC at Blacktown & wonderful layout especially the attention to detail with the scenery. Using the natural dried parts of Sedum plants the "gum" trees look the part, as does the whole depth of the layout.
Lastly, for me it was great to catch up with the many friends & bloggers, friends from times past & bloggers from times now, the friendliness of the stall holders I spoke with showed how much less stressful this exhibition appeared to be.
The cottage industry people also with their small stands, including the new kid on the block Shrike models shows also that the hobby has a bright future.
Thanks to Epping & everyone for the day, & it was great to be back in circulation.
Tuesday, 6 May 2014
Musings
The last few weeks has been slow for various reasons, as I sort of relax a bit after the concentrated work on the R/H. The primary model work has been the movement along the backdrop part of Moblayne township, with the main road all but finished along with some scenery at the depot area, & building construction taking place. Several small houses & shops have been in the process of construction, each a sort of representation of the old weatherboard structures found across NSW.
I am thankful very much for the many journeys around the state going back to my pre teens, taking in some towns that were nothing like they are today, homes on the old party line telephone networks, when truly everyone knew your business as the operators would ring through your phone code for an incoming call along the circuit, & as you picked up the phone to answer, there was the distinct clicks that announced your conversation was being heard by most along the circuit. Something not able to be modelled though.
But, the thing that stuck out in my mind was as I remembered the towns was just how basic everything was, the reality of how long between painting of houses it was, it was seemingly unusual to see a sparkling freshly painted house, & that really was with good reason, it was a mongrel job to paint those old wooden weatherboards as well as the timber framed windows & doors, likely also the window awnings & brackets, eaves, facia's & gutters back then.
The old paint had to be sanded smooth, patched & bogged up along the many cracks & often a pressure flame burner was needed to remove the old flacking pain then reprimed & sealed. The old lead based enamel paint which required at least 2 coats on top of the previous 2 other primary ones was not that easy, especially as the home owner had likely spent a lot more time at work in often much more physical duties as well. After using a hand push lawn mower to do the 1/4 acre block or larger, painting was the last thing on the mind. Even the thought of cleaning the brushes in turps & the like didn't quite seem like a joyous chore either.
Interestingly even in the 60's homes were not kept that much better on the outside either. I marvelled as I worked through suburbs on steam locomotives, & saw the extent of homes that were let go & quite run down that sat along the railway lines. The industrial fallout in many places, such as the Illawarra, Newcastle areas, along with Lithgow, Bathurst & many others was also intermingled with the smoke from steam locomotives in the depots, along with the burning of coke, coal & wood in home fires during the winter, affected everything around them.
Heading west from Northmead at night on photo journeys, & coming down into Lithgow valley, at night you could smell Lithgow 20 odd minutes before you saw it, coming in via Victoria pass was no better, during daylight though you could see in the distance the pall of pollution at the same time as you smelt it. I think pristine homes were a last thought owing to how quick the fallout brought all the hard work back to all but nothing, in a short period of time.
In some ways, I am trying to reflect that era in my modelling, well its a good excuse for poor handiwork in scratch & kit building & something I am going to stick to. To capture this sort of image, we are fortunate for some very good books out there that show much of that bygone era, these as well as travel experiences do much to rekindle those memories that I have from those years ago.
The photo showing the cab of 5917 in the about me on the home page, shows me hanging out the cab of the engine along with the Enfield Driver WK Smith leaving Enfield depot to work 675 north ex Enfield, this was the last working of a 59cl on a revenue goods train all the way from Enfield to BMD, the date is in 1972 & is recorded in a NSWRTM magazine with the listings of the last steam workings on the Short North.
The job was a call out, as the rostered fireman had gone sick, well I know the reason for it, as I also remember the trip as a hole. I was to subsequently work on 5917 again in 1980 from Unanderra to Moss Vale & return on a Legacy train, this time as the driver, likewise some years later on the same engine again returning from Cooma from Bredbo to Michelago. Times of memory rekindling to sit in the fireman's or even the drivers seat after many years away from them.
Some 5 eventful trips to China between 2001 & 2012 to see steams last great stand, also rekindled those memories. Those memories were very easily rekindled by the aura that came from Steam, the various smells long gone, did not change. What the smell & atmosphere was in NSW back in 1972 at Enfield, & later in those other working times, was exactly the same thousands of Kilometres away on the lines across China, while the engines looked different as did the crews, that was all the difference really was.
Over Easter 2014 my wife Julie & I travelled down to Canberra, where we had a day at the War memorial, what a change since my last visit back when a teenager, & waiting on the Vietnam marble lottery to fall, when it happened I was left on the railways rather than the potential to SE Asia & the tropical resorts over there.
On the Saturday night we went to the photo shoot with both 3016 & 6029 in steam, where we also met up with Towelly, & another friend from up this way, & a very enjoyable evening was had. What made the night was after asking the museum about prospects for some sound recordings, & gaining approval for them on arrival I was pointed towards a person who was "driver in charge" of 6029. On meeting up with him an instant recognition took place & knowing him as an ex Engineman from Broadmeadow, he also recognised me & some time was spent in recounting names & experiences on the ground, then an invitation back in the cab.
The invitation was accepted with the warning, come & look at the luxury that its fitted out with. Climbing up & into the cab, those smells & atmosphere was once again high in the nostrils & all other senses that could take it in. Luxury 21st century 60cl style was found in the arm rests & seats, gone was the 1/2 inch thickness of padding over timber of horse hair seats & backrests, thin arm rests, rather both seats & arm rests were full of thick firm foam, as well as the back rests, which in many ways compared well with some of the better seats in diesels, certainly no other steam locomotive in regular service had anything like these.
I was then sat in the fireman's seat & told to put a fire on. Suddenly I was taken back to 1972 & looked at the gauges, & valves, after a short look over, I reached up to the main steam valve up on the boiler back head & was opened, then the stocker motor control valve above the 5 knobs that controlled the steam jests to the spreader plate was opened. The noise of the stocker along with the jets raised to a high pitch, the noise of which was quite incredible, even after such a long break, it soon felt just part of the normal operation in the cab. I was then told that I had passed what apparently was a test of my memories. Shortly after the safety valve lifted at 200Psi, & some stuck fingers in their ears & head down to try & shut the noise out.
The only thing that was missing to add to those noises was the sound of the exhaust at heavy load with the cab vibrating in movement, the injector full on & stocker going fast to deliver coal into the firebox. I did not miss that one bit, nor the heat that was generated in the cab in summer, or steam leaks that prevented any sight of the driver with windows closed in the winter.
Ahead was the ultra shine of the brand new gloss black paint, later to be covered with fine ash when the fire was knocked down, one trip was all it took for such an engine to lose its gloss & just become a dirty beast, one of many.
Some photo's of the night.
R & R Reaquainting & Reminiscing
From the drivers seat
Wednesday, 26 March 2014
At last
After months of work the Moblayne R/H is in place, albeit not totally as its still just sitting there, & with some minor adjustments to be done to the internal lighting, that will stay as is for the time being, the only other things needed for completion is smoke shute covers, & external lights to the outside of the shed, 5 in total.
In the end I had to do some timber removals as I really felt that having the roof battons served no useful benefit anyway, so they came off.
Down approach to Moyblayne approximate location of the distant signal, just past garage shown on previous photo.
There are some lights too bright which will be fixed, although they look brighter in photo's rather than real life although I will try to bring the levels down.
Using cut up pieces of Styrofoam boxes to form low embankment from road to trackside. Short cut out is road access into depot Home signal to be located just past the crossing.
The above 3 pics show my first real attempts at clouds, while generally happy with the result the large on the left is not to my liking so an attempt will be made to alter it. The work on the clouds has helped to try & cover some problems previously mentioned with the backdrop which has been primarily caused by the active clay region we live in, dry weather cracks appear, wet & the cracks close up & now they push together forming ridges, nothing really can be done, so its live with it & try some different things to cover up the imperfections.
Primary through main road is in place the next steps will include road base to go in place with dirt. With this section on the move now, the finishing of the pub along with other buildings will take place.
Last but certainly not least. One item that I had been eagerly waiting for was the platform for the Coxes Gully goods shed, it was a real pleasure to receive if from Rod Kelly on Monday just gone, along with his wheel painting device & another water tank stand, the main truss part of the stand was cut out that night, & now ready for assembling, this leaves one more stand that is needed.
I say a real pleasure to receive the platform as I looked over it, & while the detail is superb, the actual assembling of it by Rod is absolutely top rate, a real pro's work indeed.
As I looked at it & put the Ian Lyndsay building on it, I thought that it actually needs to be eventually situated elsewhere & it will end up in the Moblayne goods yard, I will scratch build a G1b goods shed for Coxes as it would be a more suitable size for this location.
A real appreciation of work indeed & many thanks Rod.
The worst aspect I find with weathering models factory painted is getting chalks & powders to stick, I have a steel Scratch brush from Walthers a $4.95 investment that I love, the first photo shows one side with original paint & condition, above photo, shows the platform from Harlow graphics also my weathering of the other side of the MRC after using the scratch brush to take back the paint, & apply the chalks
In the end I had to do some timber removals as I really felt that having the roof battons served no useful benefit anyway, so they came off.
Down approach to Moyblayne approximate location of the distant signal, just past garage shown on previous photo.
There are some lights too bright which will be fixed, although they look brighter in photo's rather than real life although I will try to bring the levels down.
Using cut up pieces of Styrofoam boxes to form low embankment from road to trackside. Short cut out is road access into depot Home signal to be located just past the crossing.
The above 3 pics show my first real attempts at clouds, while generally happy with the result the large on the left is not to my liking so an attempt will be made to alter it. The work on the clouds has helped to try & cover some problems previously mentioned with the backdrop which has been primarily caused by the active clay region we live in, dry weather cracks appear, wet & the cracks close up & now they push together forming ridges, nothing really can be done, so its live with it & try some different things to cover up the imperfections.
Primary through main road is in place the next steps will include road base to go in place with dirt. With this section on the move now, the finishing of the pub along with other buildings will take place.
Last but certainly not least. One item that I had been eagerly waiting for was the platform for the Coxes Gully goods shed, it was a real pleasure to receive if from Rod Kelly on Monday just gone, along with his wheel painting device & another water tank stand, the main truss part of the stand was cut out that night, & now ready for assembling, this leaves one more stand that is needed.
I say a real pleasure to receive the platform as I looked over it, & while the detail is superb, the actual assembling of it by Rod is absolutely top rate, a real pro's work indeed.
As I looked at it & put the Ian Lyndsay building on it, I thought that it actually needs to be eventually situated elsewhere & it will end up in the Moblayne goods yard, I will scratch build a G1b goods shed for Coxes as it would be a more suitable size for this location.
A real appreciation of work indeed & many thanks Rod.
The timber platform with Ian lyndsay shed on it. The 2 MRC's are the latest run from TOR. Still the same body but the additional items of detail improves the look, the worst is still the timbers which are a bit too heavy & deep, also the paints pretty heavily gloss.
The worst aspect I find with weathering models factory painted is getting chalks & powders to stick, I have a steel Scratch brush from Walthers a $4.95 investment that I love, the first photo shows one side with original paint & condition, above photo, shows the platform from Harlow graphics also my weathering of the other side of the MRC after using the scratch brush to take back the paint, & apply the chalks
An OTM latest run LLV, sits next to the MRC, this has been weathered slightly with the scratch brush, & some chalks on the scratch brush, bogies are painted using Sonja's Nimbus grey as undercoat & chalks on top.
I have found the MRC wheels to be slightly too thick, & bind on my 1:40 grade with 28" radius curves that also has some super elevation on them, replacing the wheels with 100 wheels from TOR, improves them no end. In the AMRM review mention was made about the wheels supplied with the models being not what was ordered, sadly some more issues with China factories. I could not work out why the binding too place until I did a back to back measurement of the actual wheel, which revealed the ones on my 2 models were closer to 0.114 than 0.110, shows how much affect a near 1mm oversize of 2 wheels has an impact, as the models ran freely with the wrongly supplied wheels on straight track & likely larger radius curves but with the narrower wheels they run as well as any other wagon on my layout.
Sunday, 23 February 2014
Old vses new
During idle/wait times with the RH I have taken the chance to look at some other areas that are needed to be done, one of those is with my Rolling stock. While I have a few kits, much or really most of my R/S are RTR models that have been collected over the years, what is very obvious is the change in the overall levels of detail on them, I could use the term quality but that is a term that I would prefer to leave alone as every person has their own view on what we receive these days, & being perfectly honest I believe a lot of them, leave a bit to be desired, some more so than others.
My chief desire is to have a layout operating that is representing an era in the NSWGR, its not a replica of any place or the like, & while I admit to my little areas of being pedantic, I am a bit forgiving in others, allowing for a bit more fudging in them. So in one of the recent idle times I was going through my box of RTR goods rolling stock & the smallish collection of some S & K trucks, with a couple of exceptions they are RTR versions of the old Austrains brand, now belonging to TOR.
Sometime soon the new Ultimate S truck from Austrains, is supposed to arrive &, I wonder what this model will actually be like compared to the others & at what price? The models I have in kit form are old Bergs models, dating from the 60's with a price tag of $6.50 on the bag, a Callipari model from around the same time with the cost IIRC of around the same price. I actually shudder when I look at what we got back then, the Bergs bag comprised of 4 sides & a floor, which I never got to fit without cutting the sides down in length, & was baffled at the ends with some weird casting, which I supposed was to replicate the fixture for a hook coupling, the sole bars never seemed to sit square, & these days only bits remain of them, A K truck has the same coupler set up & the same problem with the sole bars & W iron parts that are bowed in one end & out the other. Now $6.50 was not cheap back then, especially as there were couplers & wheels to buy, & that was the same with the Callipari version, although later some ordinary plastic wheel sets came with them.
At least those went together well, & 2 still remain. The Bergs K truck has an old Urethane water tank in it & the side doors removed to be for filling lineside fettlers tanks, how that can happen is beyond me, owing to the contortioned W irons, & finding wheels to sit in them.
The 2 S truck kits along with the Austrains RTR are each of the same type, of which I understand there were a couple of different type S trucks were in service, that basically had different sides/doors to them, I guess I am hoping that the Ultimates will come out as one that is of the different door design than those already on the market. A reference in last years AMRM mentions TOR are rerunning the old Austrains types again, but we wait & see what mods are done to them when they arrive.
The thing is though, if these new releases, that is the TOR Rerun, & Ultimate are the same as those already done, I wonder at what value or price point they will be at, & are they going to be worthy replacements or additions to the old kits & RTR models? In the interlude times with the Round House, I found I had 22 of the Austrains K trucks, getting them out, the glaring issues with them is the side doors with the ultra sharp & pronounced diamonds on them, the blob that is the hand brake casting, along with the thick side walls, & no internal wall detail.
Looking at the RTR S trucks the same thing shows up with them, although the side walls lack internal detail they are actually slightly thinner than the Callipari kits, whereas the Bergs kit is quite thin & brittle, ok they are now around 55+ years old so what do we expect? I guess if one had the money & the ultimate turns out simply, well the ultimate I could stick them on ebay & hope they are worth something, or try to fix them up, & the same applies with the K.
The hardest part with both of them is the inner detail, but as most general goods trains even in the 60's had loading of some kind in both directions in these wagons, making loads or covering them with tarps can fix that problem, the hand brake can be replaced with some commercial products that will lift them ok. Spoked wheels can be added to backdate them, & weathering helps on them as well.
The K truck is another matter, especially with the thick gunwale, & sharp diamond pattern to the doors. With only 22 in my current possession, I found one that I had tried working on some 10 years ago, a crude attempt to thin down the sides, looking at that work, I could see the potential in it, likewise the problem with the diamond pressed doors.
Measuring the normal walls at the gunwale section the Austrains K trucks measured 2,37mm thick, measuring the Bergs Kit walls at the same point revealed them to be 1.4mm thick, near enough to 1mm thinner, a lot in a way to try & reduce the sides by. However, I decided to try & see what I could do with a couple of them & how much I could reduce the sides by, in order to improve the look of them.
Using a sliding box cutter that has the large blades, similar in size to the old Stanley knifes. Sliding out the end of the cutter to a point where I had only enough of the blade sticking out to scrape the sides far enough down but to prevent it from touching the floor which has timber detail, I progressed to tediously scrap away at the sides & see how much I could take away.
The more I took off the more I could feel the side flexing in as I had to hold the wagon tight, with some caution I got the side down at the gunwale position to 1.67 mm. This I considered was far enough to go, especially with the flex & needing to do the other side as well. When scraping away I did so at an angle, meaning the lower part of the side was not touched & the sides actually are angled from about 2mm off the floor to the top of the gunwale.
I then tried the ends, but found the brass grab wires were set into the ends on both sides fairly deep, which meant little thickness removed but the blade section wrecked, leave well enough alone. The next item was the diamond pressed sides, well external anyway. The primary problem I found with these was how sharp the ridges of the diamonds actually were, which I thought was the primary issue, a comparison to the same pressings on a Callipari HGM wagon confirmed that opinion.
What I then did was another ultra simple mod, using a curved blade scalpel, I scraped along the top edges in an attempt to just take the edges off. This worked on some but did not seem to work on others, as well, so with them I used a flat ended Stanley hobby file to lightly file the tip ends off. This worked quite ok & I was happy with the result.
As these models had been weathered pretty badly by me in the past, & found that the paint I had used, (whatever it was) was fairly thick & left a sheen on the models, which like an unpainted new model showed the diamond ridges very prominently, a couple of them however had been weathered differently & were quite gritty, how that was done I have no idea but certainly the diamond tips were not as bad.
Some photo's showing the K wagons both before & after the work to thin down the sides of the K truck to compare, with the weathering they have come up reasonably well, at least for me.
Above showing the Austrains K trucks with old weathering but still showing the sharpness of the Diamond on the doors.
Original K truck looking from the top showing the old thick gunwale of 2.37mm.
Modified K wagons, showing new weathering, with the diamond sides after the edges were taken off.
Lastly looking from the top showing the thinned gunwale of 1.87mm thick.
These two simple jobs I believe makes the wagon a lot more appealing, sure it still is lacking but, even on my layout its hard pressed to notice a fully detailed underneath of any models while they are stationary, let alone when passing in a train movement.
Tuesday, 11 February 2014
Movements
The waiting time for the RH windows allowed me to catch up on a couple of other jobs, including a water tank for the depot, I used a Casula tank with a timber Harlow graphics stand, I also decided that as I had time to partially detail the interior of the tank as per the articles in last years AMRM, a job that was a lot easier than I thought, however, I am still to do the wire trusses as I wait for the turnbuckles to come.
The timber stand was an easy enough building however removing the parts from the main block did create some problems, especially with the first one where I some small pieces pretty well disintegrated, but they glued back together pretty easily using PVA.
Following that problem I cut the remainder out from the board along the grain at each of the bearer ridges (can't think of the correct name) these ridges are connected by small nitches of timber which are quite hard even with a brand new blade. By removing as much of the timbers along the grain really gives a lot more room to work in to remove the parts. I spoke to Rod Kelly about this & he is going to work on the kit to make it easier to remove.
I thank Rod for the ease of talking to, & ever willingness to discuss issues with his products & make any required alterations. I now am waiting on 3 more of his stands to complete my needs.
The big arrival was from Ian Phemister with the windows for the roundhouse last week, a quick nights cleaning & gluing the window panes into the frames, priming & then giving them an initial paint using Sonjas Acrylic Nimbus Grey which I use to get a nice flat base for my R/S & found excellent here as well. I then used Acrylic soft pastels to weather the windows. A final coat is still to be done on the panes as RH windows were usually painted white but for some reason got pretty dirty over time.
The windows were then sat in place along the back wall of the RH, using blue tack to hold them roughly in place.
Once in position I was pleased to see that the rear wall & side measurements had come together pretty well, some minor adjustments only are needed with minimal gaps between windows, any filing that is needed will be done with some thin timber left over from the main construction.
The next step was to test fit the main RH building.
Again I am pretty happy with the result, although more work will be needed with this part of the construction, I am glad I have gone this route in building the whole structure, & thankfully there is not a lot of adjustments needed, overall I have to add around 1/2 inch to the rear or outer truss width on the R/H side, & about the same to the L/H mid section of the truss.
I wanted to build the RH as close to the plans as I could but the fine work of needing scale 3x2 timbers for the roof bearers really made me wonder at the sense of it, they were a right royal pain in the proverbials, but I persevered but really should have stopped & left them off.
The roof area is fairly extensive so fitting commercial model corrugated iron would have been an expensive proposition, as I have one of the Brunel corrugated iron tools I decided to try it out on the inner truss rear section. I found normal foil & the stuff sold by Brunel being not thick enough, also standard 20micron hairdressers foil the same. Delving into the pantry I found a roll of Woolworth Select heavy duty foil, labelled as caterers grade so decided to try that.
This proved much better & is stronger, but I would not use this method without any sort of support under it. I measured & cut a strip of 1mm Styrene in two sections to cover the length of truss (the white that can be seen in the photo) & then glued using PVA the scribed foil over the top of the styrene, & left it for 24 hours to dry.
Using a very sharp knife I trimmed the foil off the edges, before gluing the whole strip to the rear of the Truss. Care really needs to be taken with using this sort of foil owing to it being quite thin & easy to tear, though the finished item does look quite good
There are basically now two major steps left before securing the RH to the base which is removable & will allow me to work on getting the rear wall, windows & trusses together properly. The iron roof will be done the same using 1mm styrene cut to fit the 8 stalls of the RH, after I finish working on the lighting.
Saturday, 18 January 2014
Ray Pilgrim, is noted for his modelling works & provides
a lot of great information & challenges on his blog http://bylong.blogspot.com.au/. Its
rare that there is a post that he puts up that does not have us putting our
thinking caps on, especially in trying to create some new challenges, sometimes
I think Ray has too much time on his hands & its not going to change now
that he’s retired.
His latest post has an interesting read on the topic of
train loads, for the modeller along with a spreadsheet he has created to assist
in the working out of them for the modeller. As a result of his thread I tried
to put a comment to help with some areas he raised, trouble was that I had to
severely cut that back owing to the limits you are allowed in the amount of
Characters in a comment.
With that I suggested that I put a post on my blog & he will also post it on his blog, this may help others as well in regard to this topic. For non followers & followers of my blog, I refer you back to my post of 26/4/2013 that has some Teleprinter loads & other details on train composition to save repeating what was said there.
So, the aim of this thread is to look a bit more at the
composition of train loads for the modeller in order to gain some better
understanding of them & suggestions for working them out for the layout, as
far as possible for prototypical working.
To begin with it really is not possible in the modelling scene to be totally prototypically correct, at least that’s my opinion if for no other reason than the constraints placed on us regarding layout space, & the many compromises needed to be made. Looking at loads, who would have a big enough layout with say a long enough grade of 1:40 that would allow you to run a train that ran almost daily from Sydney to Port Waratah (PTW). That was 58 empty S trucks & Brake Van for a load of 486tons, which was hauled from Gosford by a garratt. The load is 170 under the full load for a garratt, but over the load for all other steam loco’s unless double headed. The problem is not as far as a model garratt may not have any problems pulling it but, no one that I know has layout that even comes close to the short Fassifern bank in distance wise, but also on an HO layout, it would look out of place & far too long.
Train loads on the railways were determined on what was
deemed “through loads” that is for working over set distances, usually depot -
depot or yard –yard, such as Enfield – Goulburn, Lithgow – Orange/Wellington,
Enfield – BMD, & Enfield – Thirroul/Port Kembla. The through load is based on
the steepest continual grade & the associated curvature/track conditions.
The short south to Glbn the loads were based on 1:75 which was the primary
grade between Enfield - Glbn, yet a very short section of 1:40 was had at
Picton station to the Hume Hgwy bridge, also Exeter bank had 1:66.
The western line from Lithgow – Orange/Wellington (main
line) was based primarily on the 1:66 grade at Locksley with rear end banker
from Georges Plains to mileage 161-45 allowed
that load to be hauled all the way to Orange without need to change engines.
While the actual tonnage bears the greatest consideration in
regard to the grades, the other primary factor is the curvature of the track,
this has the limiting affect on how many wagons are hauled, a long load of
empties were taxed the engine just as much if not more than the actual load,
the example of the 60 in length of S trucks, when compared to a load of petrol
or wheat, shows a very short train by comparison. 7 loaded BWH & van = 463
tones, room for say a loaded S as cover truck then the load comes to 10 = 21
for 485 tones.
Also, just to confuse things, not all grades are the same,
especially when it comes to the steeper grades of 1:40, a standard goods engine
was allowed 360tons Enfield Hornsby, then 390 to BMD, for Tumulla, & IIRC
Ardglen on the down was just 330tons, the sharper reverse curves were the
reasons.
Looking at the goods load (in tons only) for other 1: 40 grades
on the west, 36cl & the standard goods loco’s trains, we find the
following. Down Orange – Borenore, 36 = 325, 50 = 385 UP Molong Nashdale 36 =
295, 50 = 385. Light type garratt both
directions 575, & heavy 600. Down; Blayney – Lyndhurst 36 = 275, 50 =
325. Up Mandurama – Blayney 36 =310, 50
= 320. Comparing loads for grades as shown by the examples here shows
differences in them all & each would have special conditions applying to
these loads as shown in the WTT’s.
Single engine & double loads. As mentioned single loads
were primarily based on both load & length, but when it comes to double
headers, the load as well as the length becomes a becomes a balancing act, with
the length often exceeding that of the single engine, which usually meant at
best 5 extra S trucks could be taken on a double load, instead of 55 as per the
Short south, it would become 60 in length, with heavy load & long length
the double load in itself was quite taxing on a locomotive. The last
consideration was the engine type, if both engines were of the same type, eg,
freighters, or 36, 38, or a combination of the types, there was need to
consider the lowest haulage speed of the engines & base the loads on that.
Freighters usually slogged at a max grade & load at
around 8-10mph (1:40) closer to the 10 or a bit more, on 1:66 & greater
depending on curves, a 36cl was usually around the 12-15mph, with a 38 around
the 15-18mph, this can be seen in the running time sections of the applicable
WTT. The mixed engines of passenger types were pretty easy, while a combo with
a freighter often had a detrimental affect on the passenger engine as they
could get slower than their loaded speed, meaning careful driving was needed,
especially with 35 & 36cl as they could readily slip, & if you missed
the tell tale exhaust talk warning you, it was possible for a bad slip pulling
the fire on the pax engines, meaning big time trouble, bad on the pig, worse on
the nanny.
75% loads. These were
common on the southern division in the pre exp goods train days, & generally
confined to fruit & perishable expresses & stock trains, these were
usually limited loads that ran to accelerated times, primarily on the grades
though as the R/S & use of freighters limited the flat terrain speeds,
balanced wheel engines excepted.
However, as freighters were withdrawn from the western
division & replaced by 36cl, a lot of adjustments were needed. One being
the tabling of all west bound through goods services to 75% loading &
conditions. As single 36cl load on Tumulla was 285tons, but could take 485tons
from Lithgow, doubling them with another pig banking at Tumulla load permission
was given to run the through 900 ton double load assisted in the rear for
3x36cl, owing to the max length of 60 not being exceeded.
The 75% load was, as found in my comment on Rays blog, allowed
for a standardised load to be applied to trains west of Lithgow, be that a
single or double header they being 485
tons single & 900tons double (the double load also was worked by heavy
garratt) all taking the same length. This created an easy means for both train
timetabling as well as making up of the loads at Lithgow or Wang as was the
case for some trains especially for Cowra. As 36cl running times were generally
applied the running up grades was faster than the slow full load slog of a
freighter. These trains were simply called “three quarter runners”, & ran
on accelerated timing.
The usual slowest speed that freighters were loaded for was
app 8-10mph, the 36cl was 15mph, 38cl 18. In the above western sections, interesting
that freighters hauled a heavier load than 48/49cl they were limited to 500
tons single over the same section & only 45 in length.
The other primary area to work the ¾ loads was on the south
during the steam days, these were generally fruit, meat & other perishable
trains that ran to the ¾, or accelerated running schedules, often the domain of
the big engines.
How can the modeller work out what to do with obtaining a prototypical load? In the end each individual will do his own thing, & work on more than likely what looks right in his eye’s which is not too bad of an idea at least to start with anyway. For the modern era modeller, I have no idea of the way things work these days, loads length & even running times, so I will leave that to others. I model as most would know a limited era time frame 1955 – 1957, a bit before my time but one that I know was not much different than the middish 60’s & pre the Mk2 44, & 48’s, except for big engines I worked on most steam in service in my chosen era.
The issue of load & lengths really only comes into play for the modeller who has grades on his layout, I have one section of 1:40 on a 28” radius curve facing up trains, thus it is the limiting load factor for my loco’s. The benefit of course is that it by its grade & curve is a limiting factor for modelling purposes, & each should look at his layout & any grades on it & make allowances for them.
The basic length is based on the humble S truck (those from the current Austrains releases are the same as an S truck for length purposes) all train loads & compositions (again see my previous blog post) were governed by that length, to complicate things, wagons like the K were 1.2 in length, some early bogie wagons were 2 while others such as the BD was 1.8, while later from the BDL onwards they were 2.3, a notable exception being the CG wagon that was only 1.7 in length.
For the modeller buying closed type vehicles such as BWH,
& later wheat hoppers, along with other closed vans, its not really
possible to work out a correct method for them, such as the difference mass,
when empty to that when loaded.
The method that I have used to determine that situation is
to simply take those wagons on down trains to be empty, while up trains are loaded.
That means any loaded wheat train that consists of BWH only, will have 9 + Van,
that equates to a train composition of 10 = 20 for 586 tons, which is the load
for a light type garratt on 1:40 grade. That also comes close to what I have
set my crossing loops to a general length of 2metres clearances, although 2
have another 200mm to play with, which helps with the garratt & big
engines.
To simplify, the length situation, remembering that I model an earlier period, I make the K & RU & equivalent wagons as being 2 = 3 S wagons, for those modelling periods with the longer than 2 equivalent bogie wagons, a similar idea could be adopted such as 2 bogie wagons = 5 S trucks.
Short loads can be easily dressed up to give them the
appearance of weight, I have some Aluminium square tube left over from my
Sydney layout, very light & fit perfectly into S & K wagons, covered
with tarps, means the train is loaded, so 8 tons becomes 23. With several of
our RTR steam loco’s having pulling power problems, they struggle with any
decent train length without some simple mods being done like adding weight, so
they are great for the empties but not so for loaded, without the mods.
Some photo's here indicate the difference of loaded & unloaded trains working over 1:40 grades. First loaded & where short trains can look ok behind steam & 1st generation diesels. Even when empty, a model train does not have to be long & loaded to look right.
Morriset. The mixed load of LCH/CCH, & loaded K wagons along with van brings the load to 598 tons, app 60 tons light, length is 23 =24.6
Same location, & same day, a 36 + 35cl have a full load of coal in LCH & CCH wagons, 16 CCH & 8 LCH + van 590 tons, length is 25=26, a full load for both engines.
Tumulla. a 50 class is banked by a 36cl on a basically loaded mixed goods train working on the wagons & their loading the approx. load of the train is 20 wagons = 28 for app 615 tons, that would be the combined total tonnage allowed for a 36 & 50, 285 + 330 tons.
3811 being banked by 36cl a primarily loaded train 19 = 22.8 the tonnage of the train would be the same as the 36 & 50, as a 38 had the same load as the 50's
3630 on up goods from Cowra with a full load,10 wagons, 2 loaded BSV, 2 x loaded BWH, 2 empty RTC, K wagon & loaded MLE with tractor being transhipped + van 11=18.2 tonnage very close to the 310 ton load for the section.
Empty bulks hauled by 3614 & banked by 3615 the loaded S is used as a match truck. 25 = 40.6 the tonnage would be around the 570 tons the load for two single 36cl.
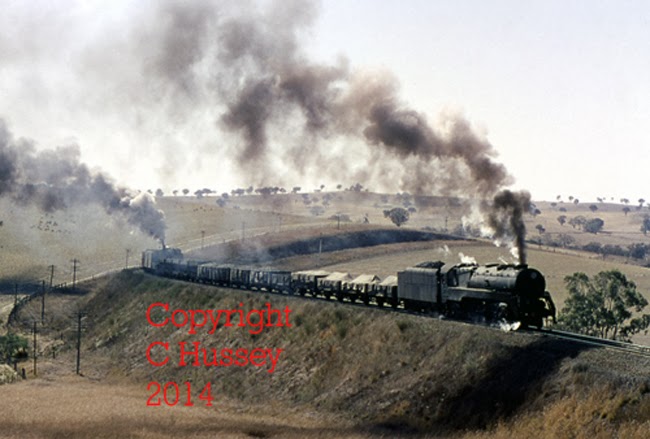
An up goods near Nashdale hauled by 6015 32 = 47. While much of the loading would be empty, with a couple more bogie RTC's & the van to come, it would have been close to the full load for a light garret 575 Tons
6011, on another general goods, with Molong in the background. Owing to it being an old slide & grainy, needing another scan done of it, its hard to pick the length of the train however given that the rear vehicles are empty flat wagons, with wool & other traffic including other empties, I would say the train would be very close to max length of 60 with a load of 575tons. Taken in 1966 entering into Spring with the drought broken.
Ourimbah in 1963. Here is where length & load greats a struggle the load would comprises petrol & a bitumen Tank wagon 2 loaded S trucks & the stock wagons are likely loaded owing to train marshalling, the remainder are empty S & K wagons, load would be close to max tonnage & length for a single garratt.
Subscribe to:
Posts (Atom)


